By George House/14,July,2025
Installing a 36-inch door as a DIY homeowner or contractor should not be a problem. But in some cases, you might find yourself struggling to fit a 36-inch door no matter the dimension you try. You have nothing to worry about; we are here to guide and support you through your door purchase and Installation process.
The main cause of problems when installing a door is the rough opening, especially for a 36-inch door, which is most common for interior and exterior use. Getting the correct rough opening dimension is important before you even start framing or ordering, let alone installing.
In this article, we explain what a rough opening is for a 36-inch door and provide a complete step-by-step installation guide.
What Is a Rough Opening
The term “rough opening” (RO) is the extended wall space that gives room for where the frame will be fixed when a door is installed. Remember, a door comes with its frame, shims, and other adjustments that hold the door firmly to the wall. The wall space where these components will fit in for the door to sit firmly is called a rough opening.
A rough opening is both depth, height, and width specific. Meaning you have to measure the wall height, width, and at the same time, the thickness of the wall for you to get the appropriate rough opening.
Why the Rough Opening Should Be Bigger than the Door and Its Importance in Door Installation.
The importance of a rough opening can not be overstated. This is because the rough opening is the key component that ensures doors fit in the right space and do not fall when being opened and closed.
However, one of the major curiosities that peaked inside many is why the rough opening has to be bigger than the door and why it is so important in door installation. The reasons are not far-fetched, as we started below.
● Creates Room for the Door Frame
When you purchase a pre-hung door, it always comes with an attached frame that provides support to the door while ensuring security and ease of opening and closing. For this frame to function perfectly, it needs to sit perfectly inside the wall.
This is where the rough opening comes in. You need to create a rough opening that’s larger than the actual door frame measurement to make the frame installation possible.
● Allowance for Floor and Subfloor Variation
You might have seen your doors scratch the floor while opening and closing. That’s the effect of a poorly measured rough opening at the height level. Floor and sub-floor variations need to be accounted for when you measure rough openings.
You need to give an extra vertical clearance at the top of the wall and also the floor section. The additional vertical clearance will provide room for the door to open freely when installed on tiles, hardwood, rugs, and carpets.
● Space for Shims Adjustment
Practically, the walls and floors are perfectly flat and leveled. So when you leave an additional rough opening, the door installer can make adjustments easily with the shim. These adjustments are important to align the doors properly for smooth opening and closing without hindrance.
Rough Opening Size Measurements for a 36-Inch Door
Ideally, 36-inch door is the most common size for indoor and outdoor houses. So it’s very important to get the appropriate rough opening size measurement for ease of installation.
It’s a simple but technical process with many factors to consider, including the shims, door frame, and other components that require adjustment.
So, for a 36-inch door, your rough opening dimension should be as follows.
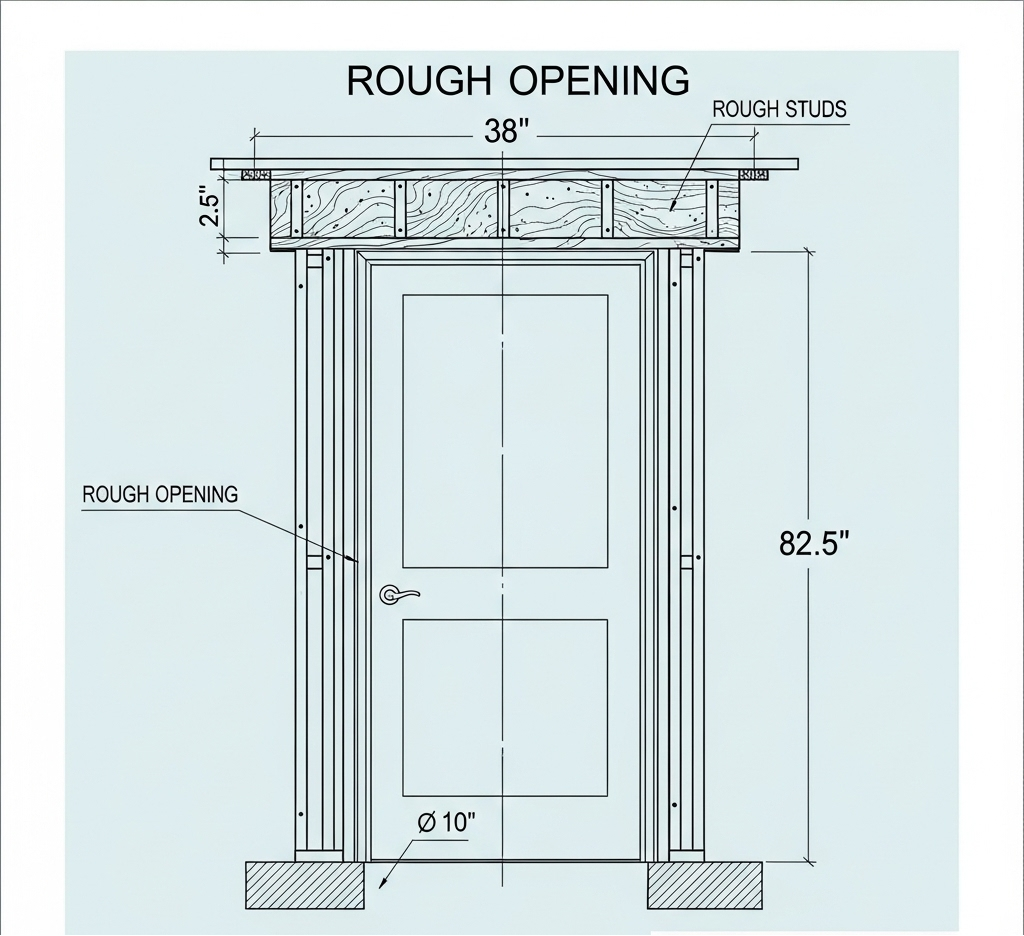
- Width: 38 inches.
- This measurement includes 36 inches for the door slab, while the extra 2 inches will be accounted for in the frame, shims, and other adjustments.
- Height: 82.5 inches
- The measurement will include 80 inches for the door slab length, while the extra 2.5 inches will accommodate the door header, sub-floor variations, and any other clearance needed.
As we’ve stated, getting the estimated rough opening dimension for a door is very simple. The standard mechanism for getting the rough opening dimension is to add 2 or 2.5 inches to the door width, while you should add 2.5 inches to the door height. You can consult the following table to get the accurate rough opening for your doors.
| Door Size (W x H) | Rough Opening Width | Rough Opening Height |
| 24″ x 80″ | 26″ | 82.5″ |
| 28″ x 80″ | 30″ | 82.5″ |
| 30″ x 80″ | 32″ | 82.5″ |
| 32″ x 80″ | 34″ | 82.5″ |
| 36″ x 80″ | 38″ | 82.5″ |
| 36″ x 84″ | 38″ | 82.5″ |
Framing Guidelines for a 36-Inch Door
Since you get the rough opening dimensions right, framing a 36-inch door should not be a problem. But there is more to framing a door, which will be covered below.
First of all, you need to get these tools and materials ready for the installation:
- Measuring Tape
- Carpenter’s pencil
- Level
- Framing square
- Hammer or nail gun
- Framing nails (10 d or 16 d)
- 2 x 4 lumber (for king studs, jack studs, and header)
- Saw (circular or hand saw)
- Construction adhesive (optional for added strength)
- Shims
- Safety gear (gloves, goggles)
Then you can start framing the rough opening by following these step-by-step processes:
1. Mark out the Rough Opening Space on the wall
Measure the rough opening space on the wall with a measuring tape. Then, mark out the measured space with a carpenter’s pencil.
For a 36-inch door, add 2 to 2.5 inches to each side of the wall, while 2.5 inches should be added to the top. So, for a 36-inch door, the rough opening will be 38 or 38.5 inches wide and 82.5 inches high.
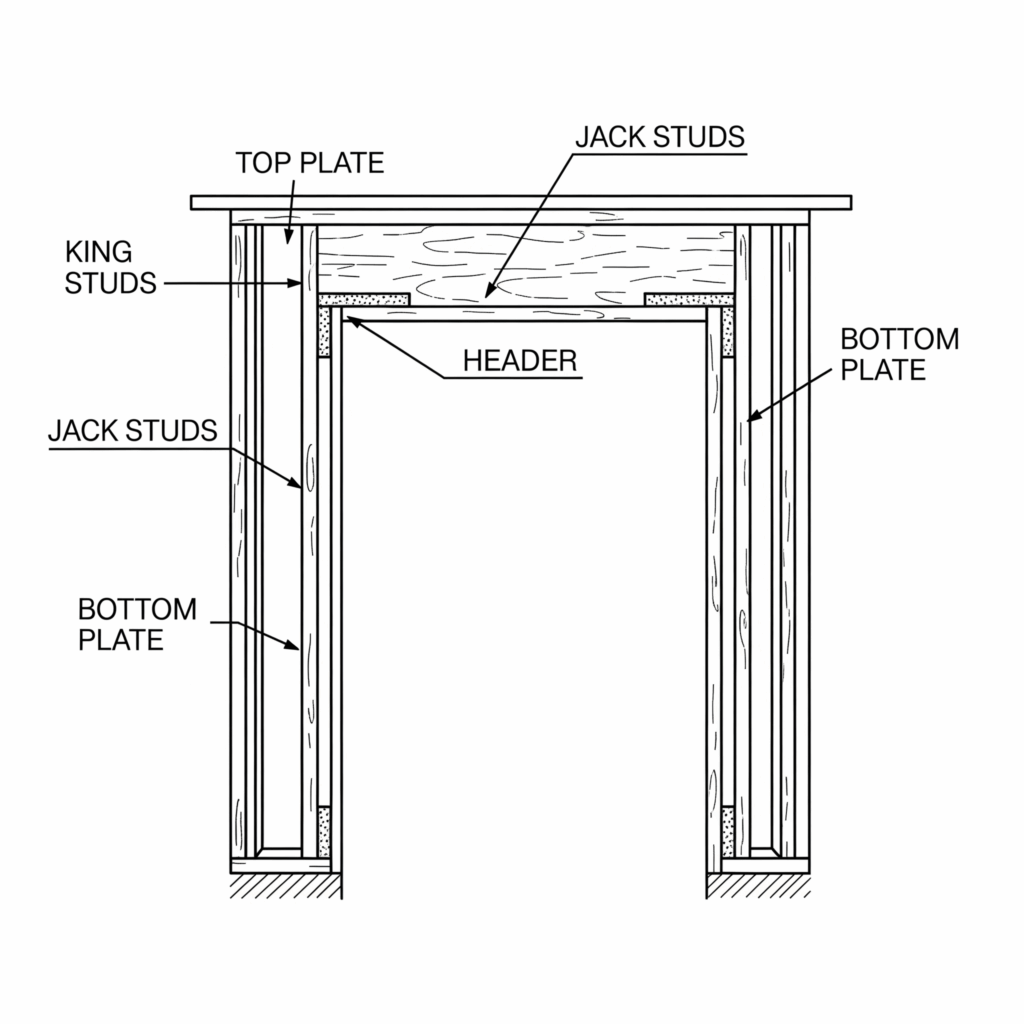
2. Install the King and Jack Stud
The king studs extend from the top to the bottom plate of the wall and hold the door frame in place. So, cut and nail the king stud on either side of the frame. The Jack studs on the other end support the header. So cut these studs, which are roughly 3 inches thick and around 79 inches long. Attach the jack stud by ensuring it is flush against the already nailed king studs.
3. Measure, Cut, Assemble, and Install the Header
Start by measuring the header, which has to be 38 inches, the same size as your rough opening. Start by assembling the header by inserting 0.5-inch plywood between two 2 x 10 lumber and nailing them together. Nail the header on top of the jack studs and connect it to the king studs on the sides.
4. Check For Plumb and Square
This is important to ensure the ease of opening and closing the door. So, check for plumb by using a 4-foot level to make sure the king and jack studs are secured properly.
The square can be checked with a measuring tape to check if the diagonals are the same on all sides. In case there is any variation in dimensions, you can decouple and readjust again before proceeding to the final installation.
Conclusion
Door installation starts even before the hinges are hung. The first and most important step is to get the rough opening dimension right. It’s the foundation that is laid for the success or failure of your door installation.
So, a 36-inch door rough opening dimension is estimated to be 38 inches wide and 82.5 inches high. In case your door falls into the higher or lower category dimension, all you need to do is add 2 or 2.5 inches to the total width measure and 2.5 inches to the height measured on the wall. This is required in order to accommodate all the door frame components like studs, shims, header, and others.