By George House/02,Oct,2025
(Source)
A door jamb is easy to measure, but even minor errors can lead to major issues during installation or replacement. The structure of your door is a door jamb, which holds your door in place. In the absence of proper measurements, there can be gaps, doors that do not close, or crooked frames.
Learning to measure a door jamb is not simply a matter of numbers; it is a matter of accuracy and attention to detail. This guide will provide you with step-by-step instructions, the tools you will require, and typical errors to avoid. You will also find standard sizes and tips of both interior door jambs and exterior door jambs.
Understanding a Door Jamb

(Source)
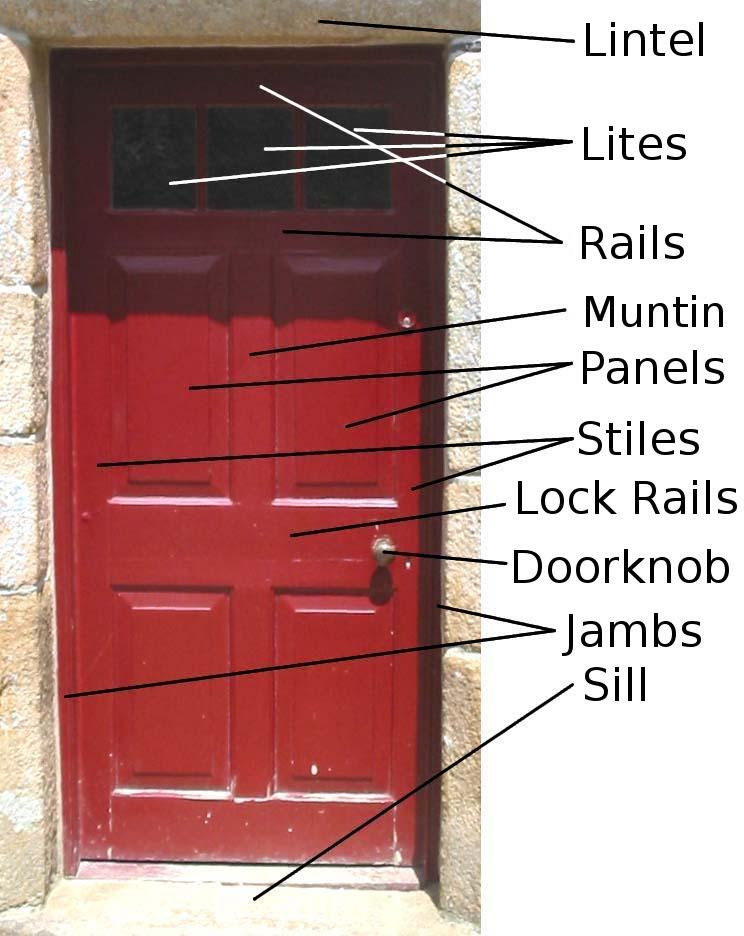
A door jamb is not just a side structure of a doorway. It consists of the head jamb on the top, the two side jambs, and occasionally a threshold on the bottom. These components combined keep the door in place and enable it to swing.
The jamb is very important to the strength of your door, and this is why measurements should be precise. The statistics provided by the U.S. Department of Energy show that approximately 30 percent of the energy loss in households occurs at the doors and windows. An improperly measured or installed jamb may contribute to that loss.
What Is a Door Jamb?
The frame around your door opening is called a door jamb. It holds hinges, locks, and the general construction of the door. The jamb has vertical sides and a horizontal top section commonly known as the head jamb.
The door cannot work without it. In the majority of houses, interior door jambs are thinner, whereas exterior door jambs need to be deeper to accommodate insulation and security.
In order to measure a door jamb, you need to be familiar with the location of each section. This prevents the ordering of the incorrect size or the cutting of lumber that does not fit. Here, your greatest friend is accuracy.
Parts of a Door Jamb
There are three main components of a door jamb. The top support is the head jamb. The door frame has two side jambs that run vertically. Some of the doors at the bottom have a threshold that closes the bottom.
Every component should be measured correctly to make a door work. Whenever you make a replacement, it is necessary to make sure that the jamb fits the size of the door; that is why it is impossible to skip proper measuring.
Interior and Exterior Door Jamb Differences
The depth of interior door jambs tends to be less since interior home walls are not thick. Jambs of exterior doors typically require greater depth because they are located within thicker walls, which can contain insulation or siding.
It is important to know this difference when you are measuring a door jamb. When you use the wrong size, the door might not close all the way, or it might have undesired gaps.
How to Measure a Door Jamb

(Source)
Measuring is not just a matter of drawing a tape, but checking each side. All the dimensions are important, and neglecting one may lead to misfits. The four significant steps are described in the guide below. Write them down in sequence and in a clear manner. Here is what you need to do.
Step 1: Take the Width of the Door Jamb
Measure the width of the top of the jamb opening. Insert the tape on one end of the inside edge to the other inside edge. Repeat at the bottom and middle of the jamb. Note down every number, since walls are not necessarily square.
In the case of interior door jambs, drywall movements can result in minor differences in widths. Siding and insulation may also influence readings of exterior door jambs. Proper width means that your door is the right size and will not rub or leave gaps. Always write the minimum number, as this will not cut the frame too large to fit in the available space.
Step 2: Find the Height of the Jamb
Next up, you need to measure the distance between the floor and the bottom of the head jamb. Do this on the right and the left. Floors are not necessarily level, and therefore, the height can vary. In the case of interior door jambs, the actual height can be distorted by carpets or flooring. Thresholds and sills should also be provided in the case of exterior door jambs.
An excessively tall door will drag, and an excessively short door will leave gaps. Always write the lowest height number to be on the safe side. This makes sure that your door fits well and does not have any trimming issues after fitting or replacing it.
Step 3: Jamb Depth (Wall Thickness) Check
The depth of the jamb is the distance between the inside wall surface and the other wall surface. This is the thickness of the wall. Lay your tape across the opening edge-to-edge. In modern houses, interior door jambs have a depth of 4 1/2 inches.
Depth can be different in exterior door jambs, based on insulation or siding. An inaccurate depth may expose a section of the wall, leaving it with a bad finish. You must always write this number down. A depth measurement is as important as width and height since it defines the flushness of the jamb with the wall.
Step 4: Record Accurate Measurements
After completing width, height, and depth, write each number clearly in your notepad. Mark them as width, height, or depth to avoid mix-ups. Record whether the measurement belongs to an interior door jamb or an exterior door jamb.
Review your notes before cutting or ordering new parts. Double-check every number, then proceed with either installation or ordering your replacement jamb. Accuracy saves time and money during any project.
Conclusion
Learning how to measure a door jamb is about being precise with every number. Accurate measurements for interior door jambs and exterior door jambs ensure smooth installation, reduce errors, and save money.
Getting it right is important. Most homeowners might take wrong measurements, which can lead to issues down the road. Worse, it can cost more money if you had had an expert by your side to measure and handle the door jamb for you. That is why it is best to get a professional who can deal with all of this.
Trust the professionals at George Group for reliable door solutions and expert installation that make every project a success.


