Bookmatching arranges paired stone faces as a mirror image across a joint. Vein matching aims to carry the main veins from one piece to the next without requiring mirror symmetry. Both depend on the actual slabs, the finished faces and the cutting layout. Neither makes joints disappear or guarantees that every natural marking will align.
For a project, the useful comparison goes beyond appearance. Confirm which slabs are being supplied, where each finished piece comes from, how the seams will read and which drawing revision is approved before cutting. A photograph of an attractive wall can communicate the intended look, but it cannot identify the material reserved for your order.
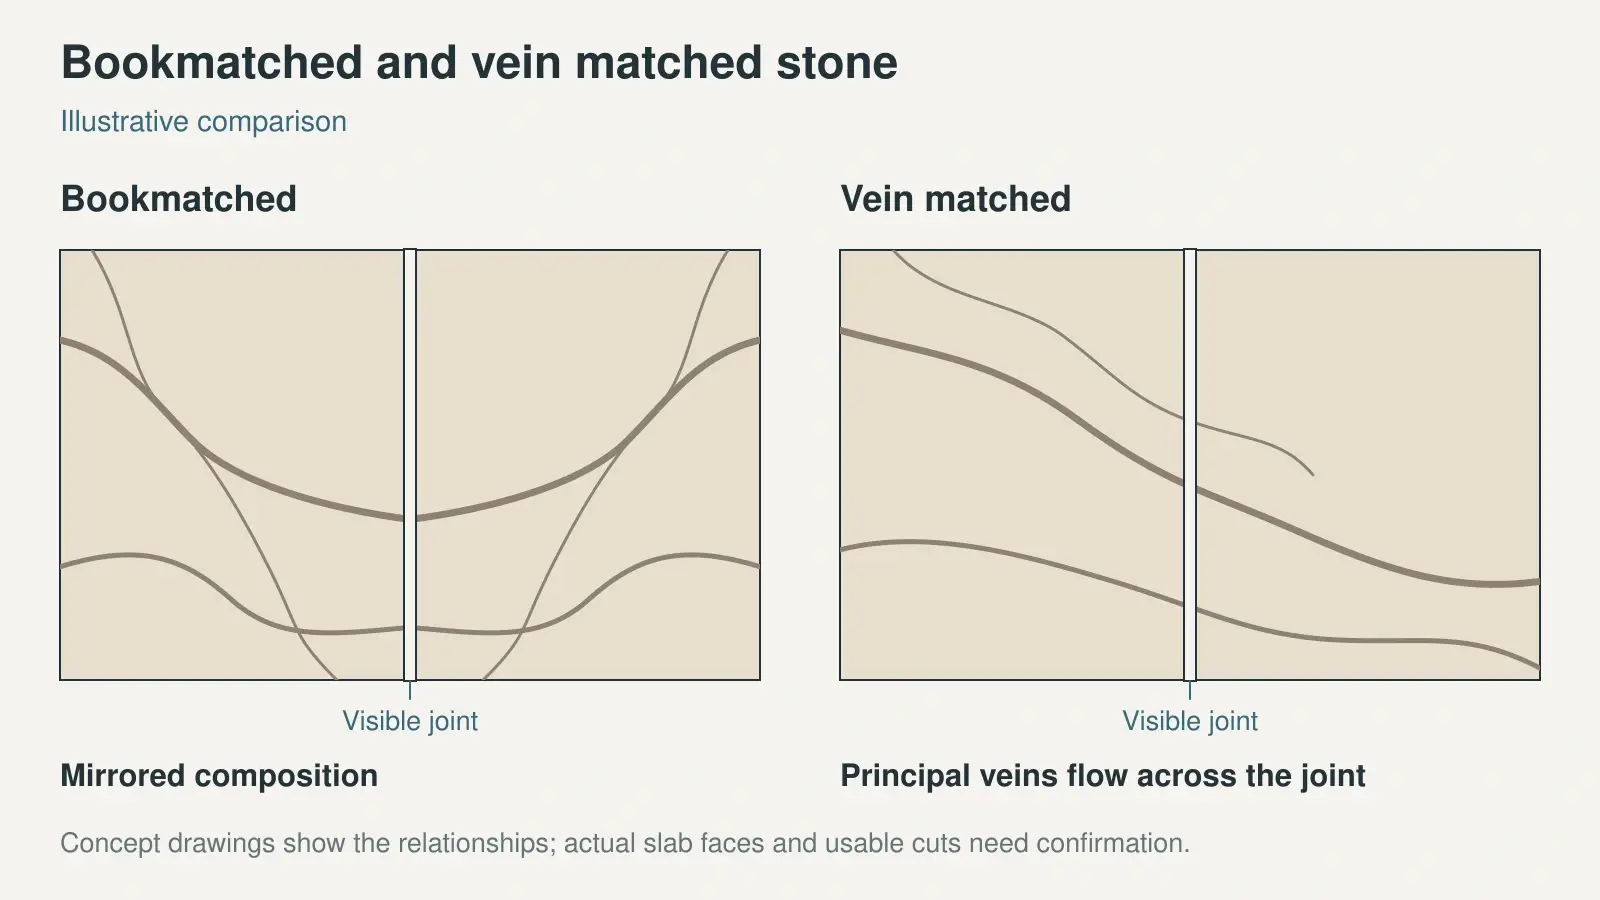
Bookmatched vs Vein Matched Stone at a Glance
| Comparison | Bookmatched stone | Vein matched stone |
|---|---|---|
| Visual aim | Reflection around a joint or focal axis | Veins flowing between adjoining pieces |
| Symmetry | Central to the intended composition | Optional |
| Material check | Confirm a suitable pair and its finished faces | Confirm the actual pieces can produce the intended flow |
| Layout check | Identify the paired edges and orientation | Identify the veins to align at each joint or return |
| Main limitation | Natural variation can interrupt the reflection | Some veins may align while others do not |
| Approval record | Numbered slabs, piece layout and joint details | Numbered slabs, piece layout and joint details |
Suppliers sometimes use matching terms differently. Show the desired arrangement on a labelled plan or elevation and identify the important veins. This is more precise than writing only bookmatch or vein match on a purchase order.
Start with Slab Numbers and Finished Faces
Confirm the material and the faces being paired
For natural stone, bookmatching commonly starts with neighbouring slabs from a block, with the originally facing surfaces processed as the visible faces. Consecutive slab numbers help trace the sequence, but do not prove that those faces were prepared for a bookmatch. Ask the supplier to show the proposed finished faces together before reserving the pair. Do not assume a finished slab can simply be turned over and used without further assessment.
Vein matching may use adjoining cuts from one slab or selected pieces from several slabs. Review tone, vein direction and the usable area together. Even neighbouring slabs from the same block can differ. Our stone material selection guide explains the wider material choices; the matching layout must still be checked against the selected stock.
Manufactured surfaces follow a different supply system. A porcelain, sintered or quartz design may offer specific mirrored faces or pattern references, while other designs do not. Confirm the manufacturer, design, finish, thickness, face reference, production identification and supported arrangement. The sintered stone and quartz comparison also explains why a surface pattern and a finished cut edge need separate review.
Connect each original slab to its finished pieces
Keep the supplier’s slab or serial number alongside a stable project piece number. Photograph the full face with its identification and orientation, and record dimensions, finish and any areas excluded from cutting. A project code should not replace the original supplier reference.
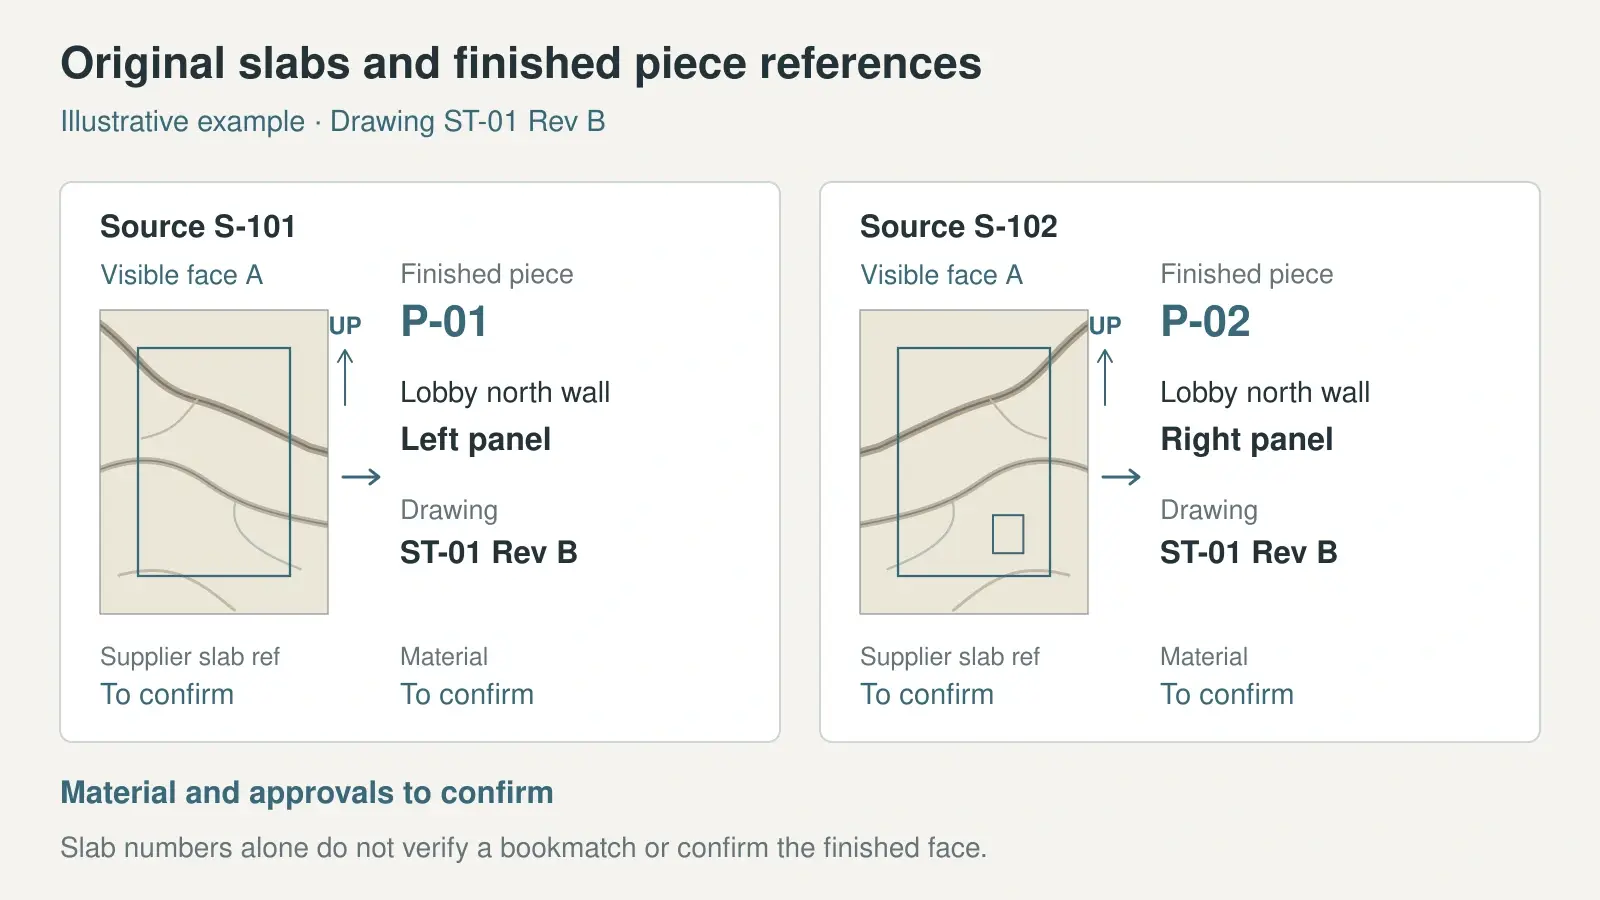
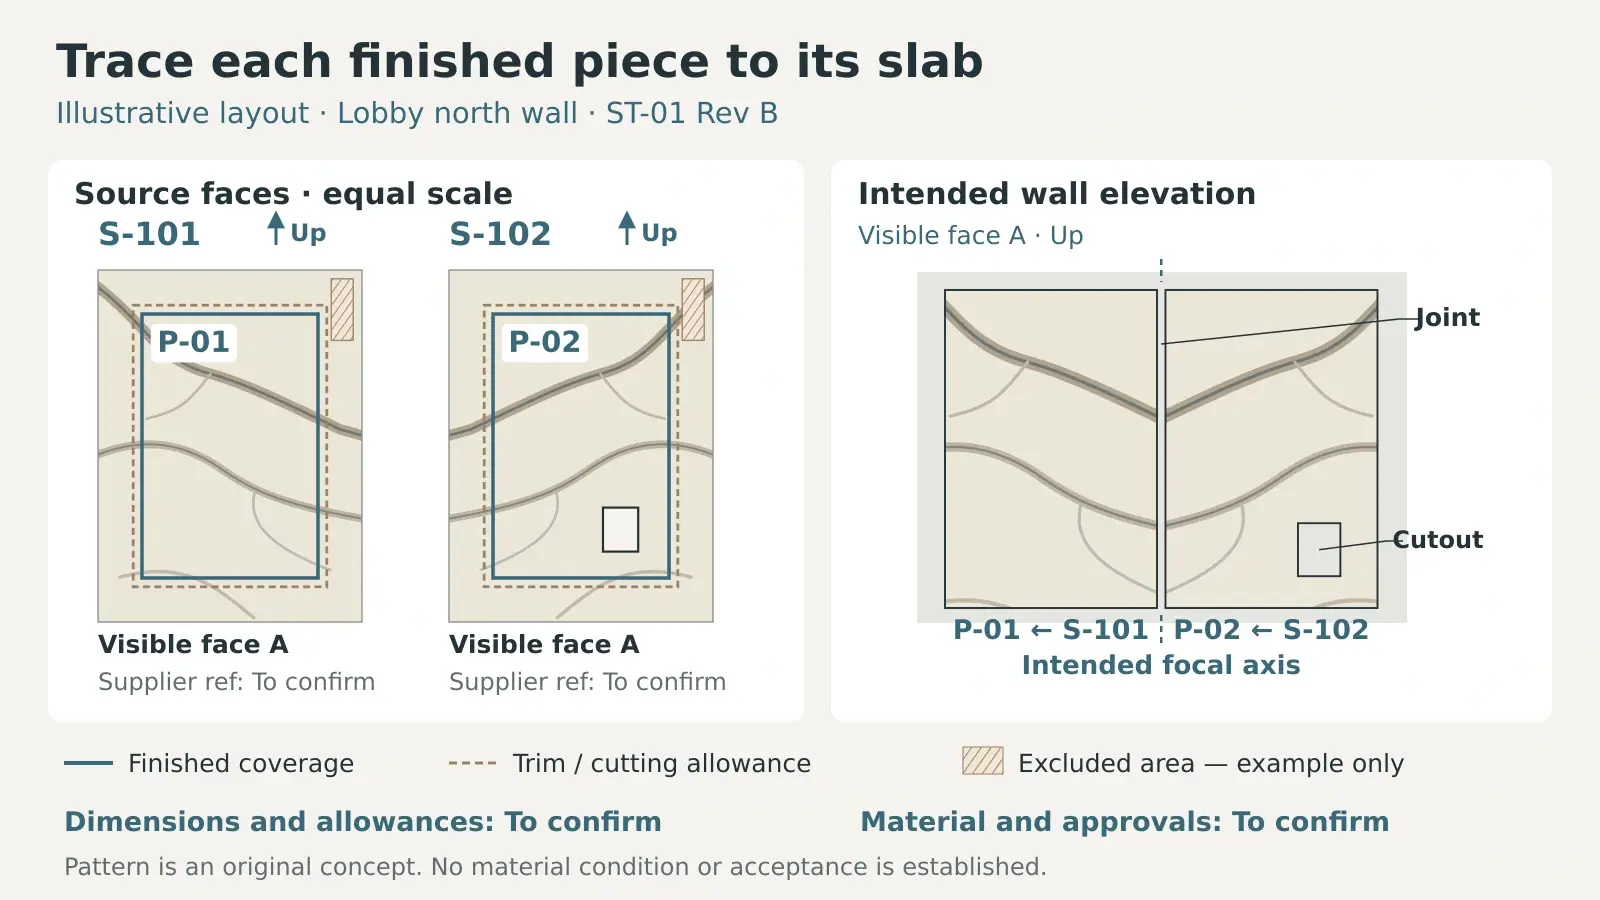
The example below shows the relationship between records. The codes are illustrative; all material selections and approvals remain to be confirmed.
| Finished piece | Original slab | Installed position | Layout reference |
|---|---|---|---|
| P-01 | S-101 | Lobby north wall left panel | ST-01 Rev B |
| P-02 | S-102 | Lobby north wall right panel | ST-01 Rev B |
The drawing should show which edges of P-01 and P-02 meet, their visible faces and their orientation. The same slab numbers belong on the source photographs; the finished piece numbers belong on the cutting list, layout and packing records. Use the finish schedule template to connect the stone finish code to the room and drawing references.
Approve the Slab Layout Before Cutting
Place the finished outlines on the actual slab images
Start with the current measured plan, elevation or template. Overlay the finished piece outlines on oriented photographs of the actual slabs, with a consistent scale and a traceable slab reference. Show the focal axis, visible edges, joints, cutouts and areas that will be removed. Include the fabricator’s allowances for trimming, cutting and edge work rather than using the entire nominal slab as finished coverage.
A digital layout is useful for comparing options. Mirroring one photograph can illustrate a bookmatch concept, but it does not prove that the matching face exists in the reserved material. Keep concept images separate from the layout submitted for approval, which should use the actual selected faces. Photograph records also need consistent lighting and should not conceal repairs or significant features through editing.
Review the pattern in its installed position
On a feature wall, review the composition from the main approach and show how it relates to openings, cabinetry and adjoining finishes. For a countertop or island, include the sink, cooktop and exposed edges. A vein that looks balanced on a full slab can be removed or interrupted by a cutout.
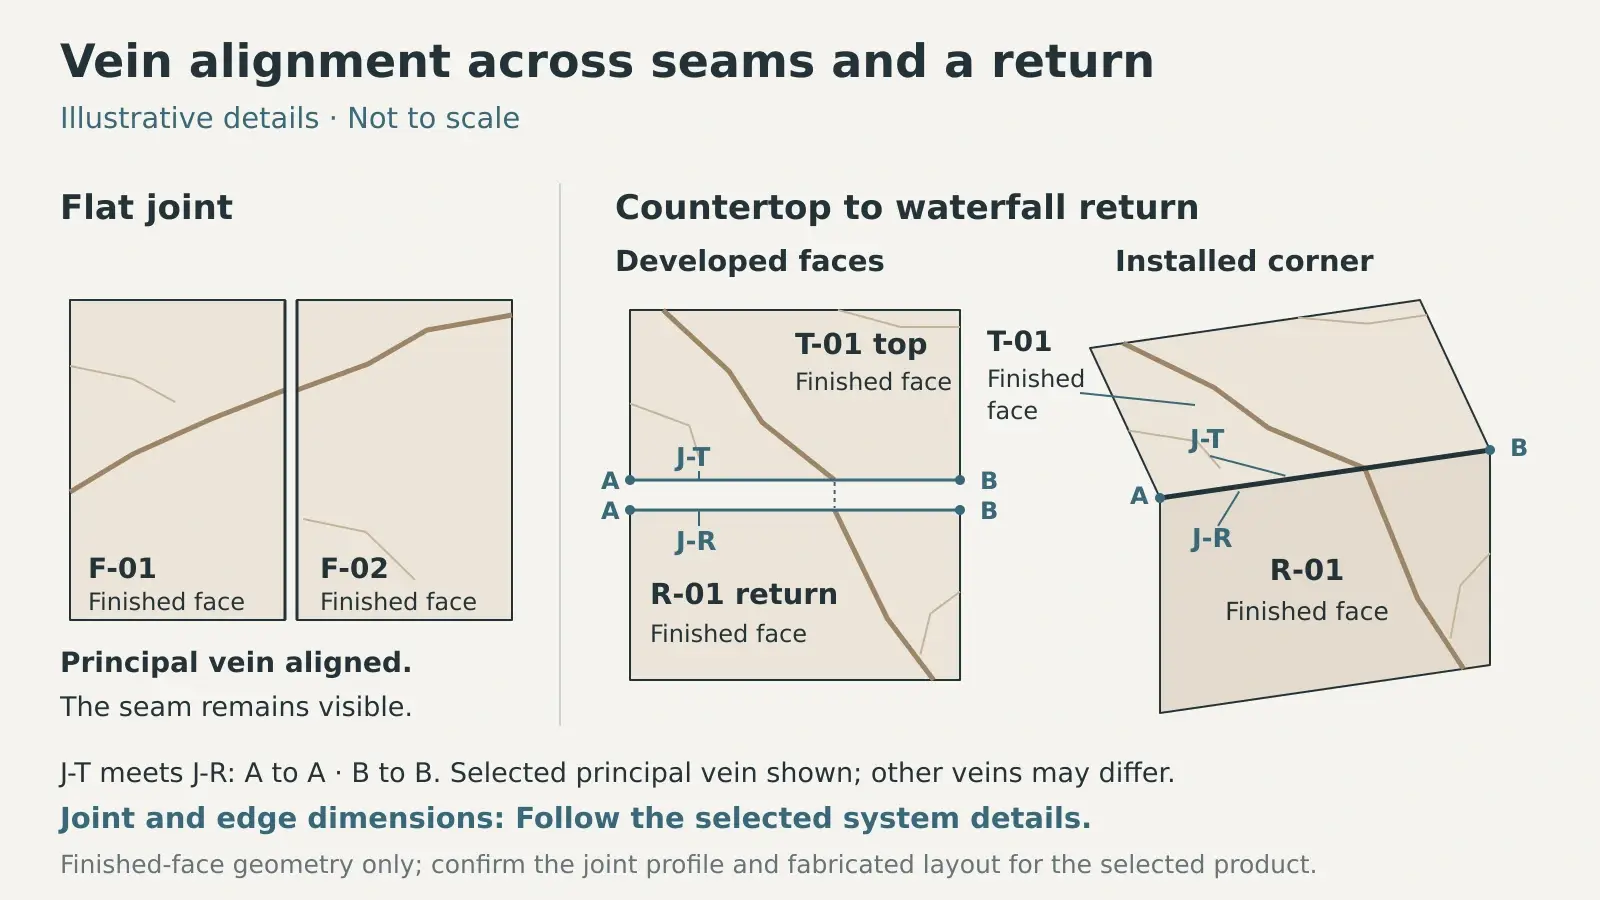
For a waterfall return, show the top and vertical piece together in a developed view and an installed view. Identify whether the intention is a vein continuing around the corner or a mirrored composition. Show the actual adjoining edges and mitre detail; rotating or reflecting an image without checking those edges can create an unbuildable match.
Plan Seams as Part of the Design
Allow for trimming and a visible joint
Bookmatched and vein-matched stone still has physical seams. Pattern continuity, joint width, edge alignment, adhesive or sealant colour and reflected light all affect how a joint appears. A line that crosses the seam successfully can coexist with a clearly visible joint.
Review the proposed seam after allowing for damaged edges, excluded areas and final trimming. Removing material from one edge can change where the vein meets the next piece. Agree which principal veins should align and where a softer transition is acceptable. Avoid a general promise that every vein will connect perfectly.
Joint dimensions and tolerances depend on the actual material, application and installation system. Obtain them from the relevant specification and current product instructions. Do not reduce or omit a required movement joint to improve the pattern, and do not apply a countertop seam detail to wall cladding without checking the assembly.
Coordinate the layout with fabrication and site conditions
The preferred pattern must fit the piece dimensions, support, fixing method and access route. Large panels may need a different joint arrangement because of transport, lifting or installation constraints. Countertop layouts must accommodate approved sink and appliance templates, vulnerable narrow sections and the agreed edge construction.
Confirm these details with the fabricator and responsible design and installation team before release. Pattern approval does not establish structural adequacy, anchoring, waterproofing or suitability beside a heat source. The marble and stone project specification page brings together the material, fabrication and installation information to coordinate.
Record the Approval Scope and Drawing Revision
Separate visual approval from permission to cut
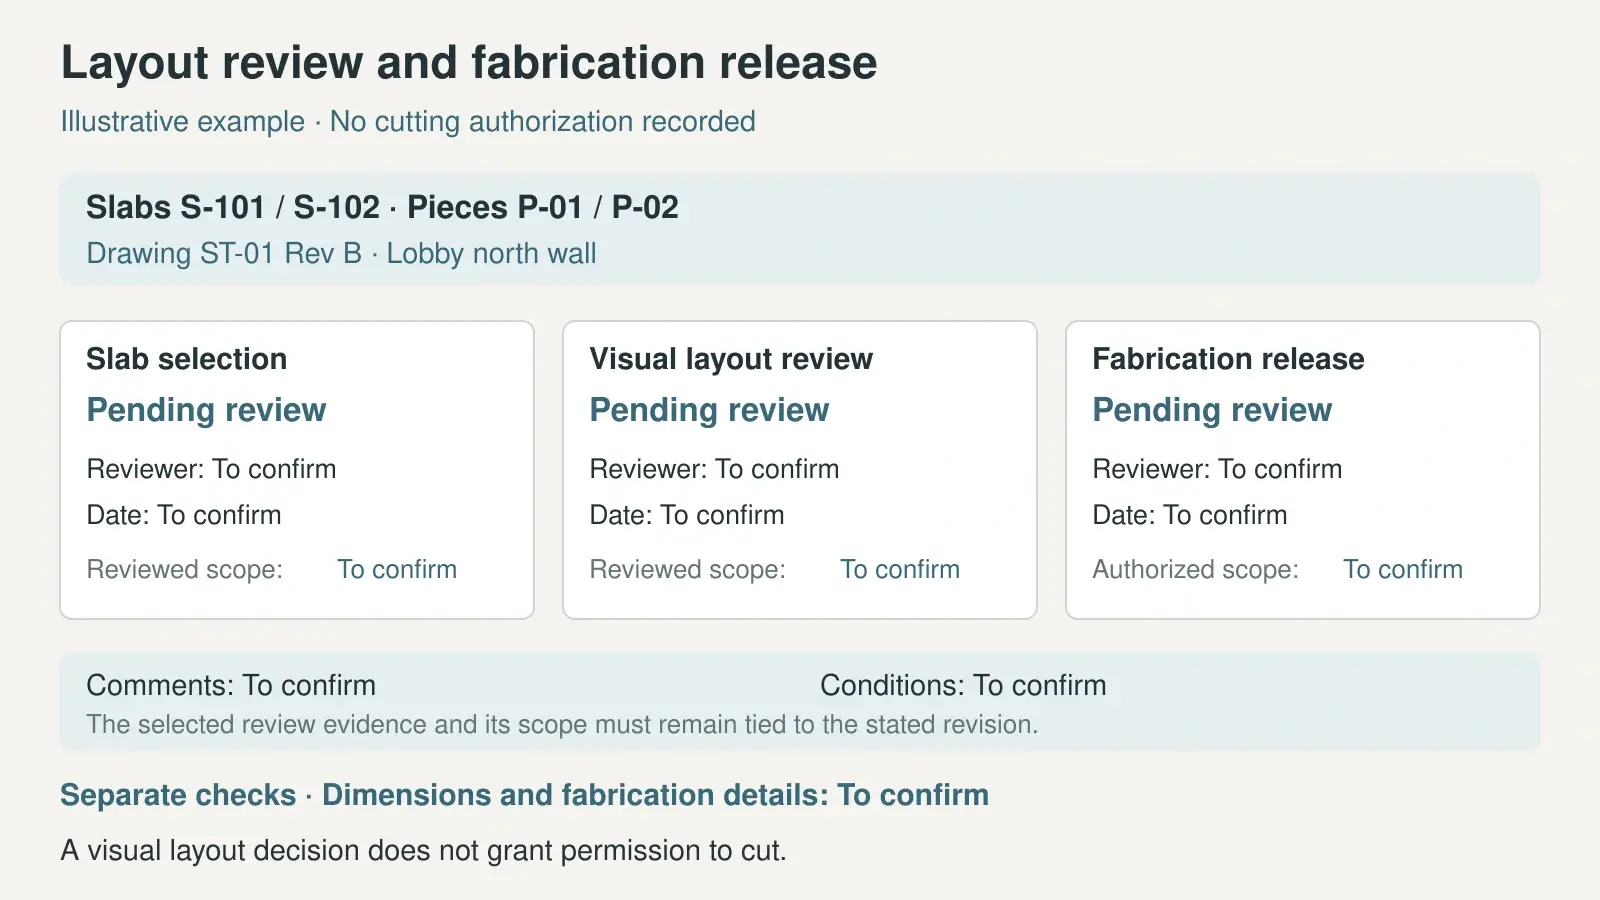
Agree who reviews the appearance, who confirms measurements and technical details, and who authorizes fabrication. These responsibilities depend on the project agreement. An email saying the colour looks good should not be treated as approval of every cut, seam or installation detail.
A practical review sequence is shown below. Record the outcome, reviewer, date, revision and outstanding conditions at each applicable stage.
| Review stage | Evidence to review | Decision to record |
|---|---|---|
| Slab selection | Actual faces, slab IDs, finish and visual range | Selected material and any exclusions |
| Layout review | Numbered piece map, veins, seams and cutouts | Accepted arrangement and comments |
| Fabrication release | Coordinated dimensions, details and current layout | Authorized scope and unresolved items |
| Trial assembly | Identified cut pieces beside their neighbours | Match, finish and dimensional findings |
| Packing and site check | Piece marks, packing list and installation layout | Correct pieces and locations, or action required |
Keep the approval linked to the specific slab images and drawing revision. Resolve comments affecting a piece before releasing that work. Our drawing and material sample coordination services describe the support available; the review and release responsibilities should be agreed for the project.
Check the cut pieces before packing
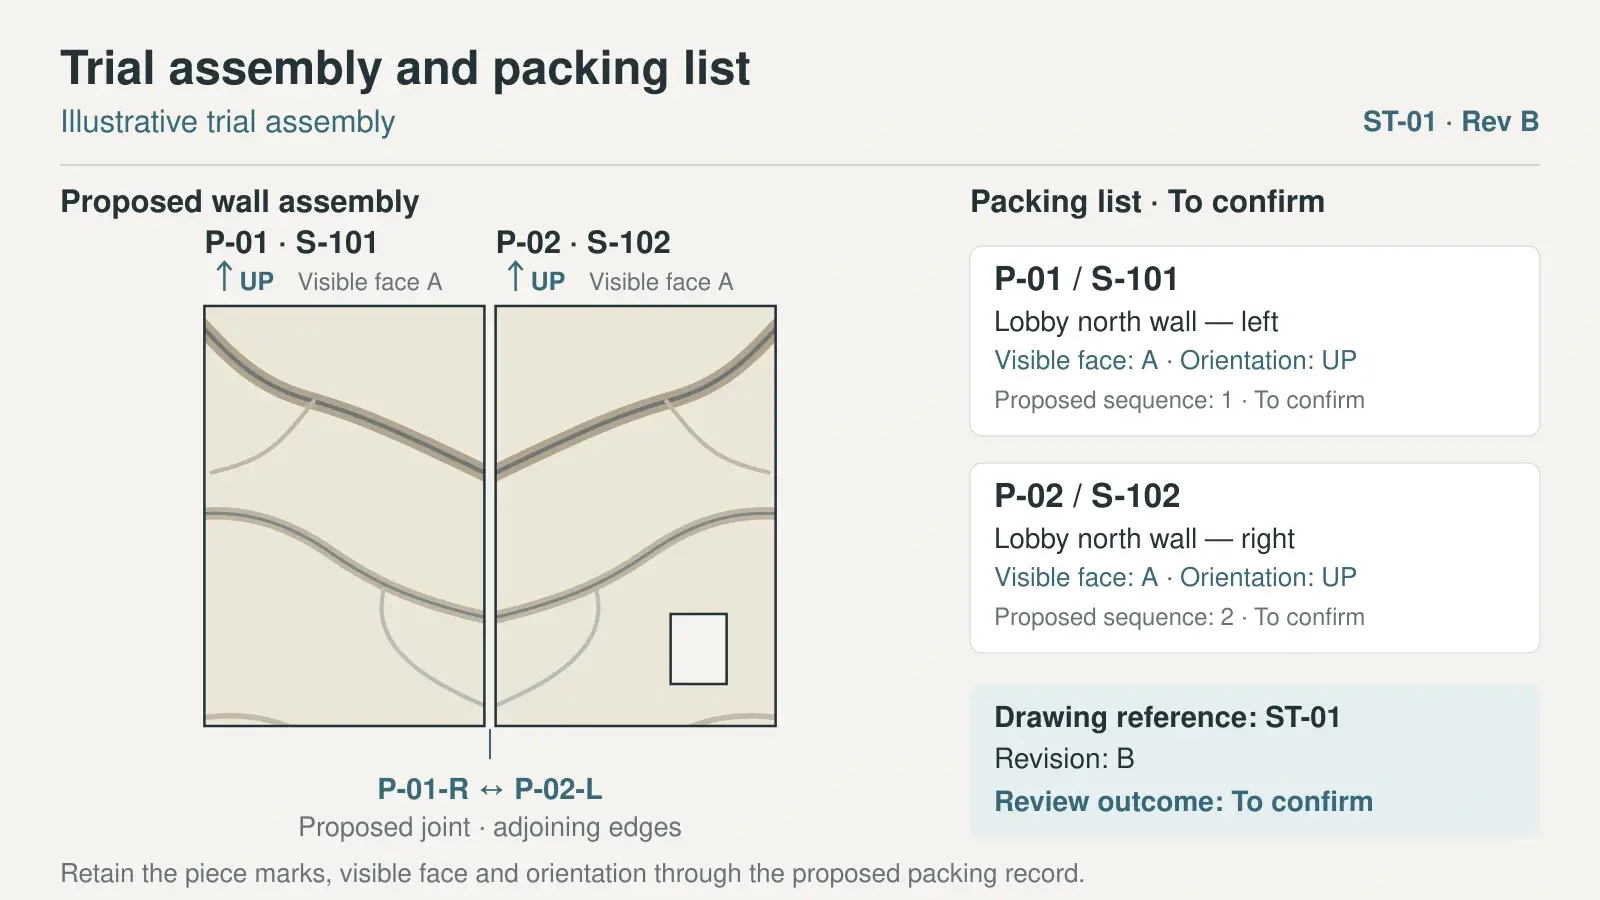
Agree whether a physical dry layout or trial assembly is required and which areas it covers. Review neighbouring pieces together, in their intended orientation, with the proposed joint arrangement represented. Inspect the principal veins, tone transitions, exposed edges and any agreed repairs against the approved layout. Record the piece marks in the photographs.
Keep this check distinct from the earlier digital layout approval. It verifies the fabricated pieces at that stage, while fit and installation conditions still need confirmation on site. Carry the piece references into the packing list and installation sequence so the approved arrangement can be reconstructed without guessing.
Reapprove substitutions and changed cuts
If a slab is damaged, unavailable or replaced, reassess the affected pair or group. A substitute with the same commercial name may not reproduce the approved pattern. A changed cutout, seam or panel size can also move the veins or alter the material requirement.
Issue a revised layout showing the affected slab and piece references. Record the revised visual decision, fabrication implications and any quantity or delivery change before the affected work continues. Keep the previous version traceable so the workshop and site use the same current information.
Compare Quotations Against the Same Layout
Neither matching method has a fixed price premium. The cost depends on the selected stock, usable yield, cutting complexity and agreed review and installation scope. A narrow piece may still require reserving a specific pair or sequence, and a replacement may affect neighbouring pieces as well.
Ask each supplier to price the same information:
- Material, finish, thickness and identified slabs or manufactured face references.
- Finished piece quantities and the current cutting layout, with material allocation explained.
- Edge work, cutouts, seams, supports or fixing components within the supplier’s scope.
- Slab viewing, layout preparation, samples and any agreed physical trial assembly.
- Piece identification, protective packing, delivery scope and installation responsibility.
- Lead time, reservation terms, exclusions and the process for damaged or replacement pieces.
Distinguish unused offcuts from spare pieces intended for future replacement. Do not apply a universal waste percentage or assume that leftover material will match a damaged installed panel. Ask what can be retained and how it will be identified.
Choose the Pattern the Actual Slabs Can Deliver
Choose bookmatching when a mirrored focal composition suits the surface and a suitable pair is available. Choose vein matching when the priority is flow across a run, backsplash or return. A project can use both, provided each relationship is shown on the layout.
For a quotation, send your stone layout and slab references with the application, dimensions, finish, quantities and delivery requirements. Include the intended matching effect, visible edges, cutouts, joint requirements and review stages. Mark unconfirmed details as pending so they can be resolved before cutting.
Frequently Asked Questions
Is bookmatching the same as vein matching
Bookmatching creates a mirrored relationship between paired faces. Vein matching aims for pattern flow across adjoining pieces. The ideas can overlap, but the terms alone do not define the slab orientation or seam arrangement. Confirm both on the layout.
Do consecutive slab numbers guarantee a bookmatch
No. They help trace the sequence, but the actual finished faces, veining and usable edges must be checked together. Confirm that the proposed faces were prepared for the intended arrangement rather than relying only on consecutive numbers.
Can manufactured surfaces be bookmatched
Some products offer specified mirrored faces or coordinated patterns. Confirm the exact design, face references, finish, thickness and manufacturer’s layout instructions. Two slabs with the same colour name do not automatically form a supported bookmatch pair.
Will matched stone have invisible seams
No. Matching concerns the relationship between patterns. Physical joints remain and their appearance also depends on edge treatment, width, joint material, alignment and lighting. Review a representative joint detail or sample where the appearance is critical.
What should be approved before stone is cut
Confirm the selected slab faces and IDs, finished piece map, orientation, seams, cutouts and current drawing revision. Record the visual review separately from dimensional and technical checks, and obtain the agreed authorization for fabrication of the affected pieces.