A tile quantity calculator in Excel turns measured floor and wall areas into an order for whole boxes. Start with the net area, add a reviewed cutting allowance and a separate spare-stock quantity, then divide by the confirmed coverage per box and round up. Keeping these steps visible makes the estimate easier to check when a room, layout or product changes.
The downloadable workbook includes blank input sheets and a filled example. It keeps room measurements separate from product and packaging records, so the same tile can be pooled across approved areas before box rounding. If the material is still being selected, review our project tile options alongside the quantity calculation.

Download the Tile Quantity Calculator Excel Template
Download the Tile Quantity Calculator Excel template (.xlsx).
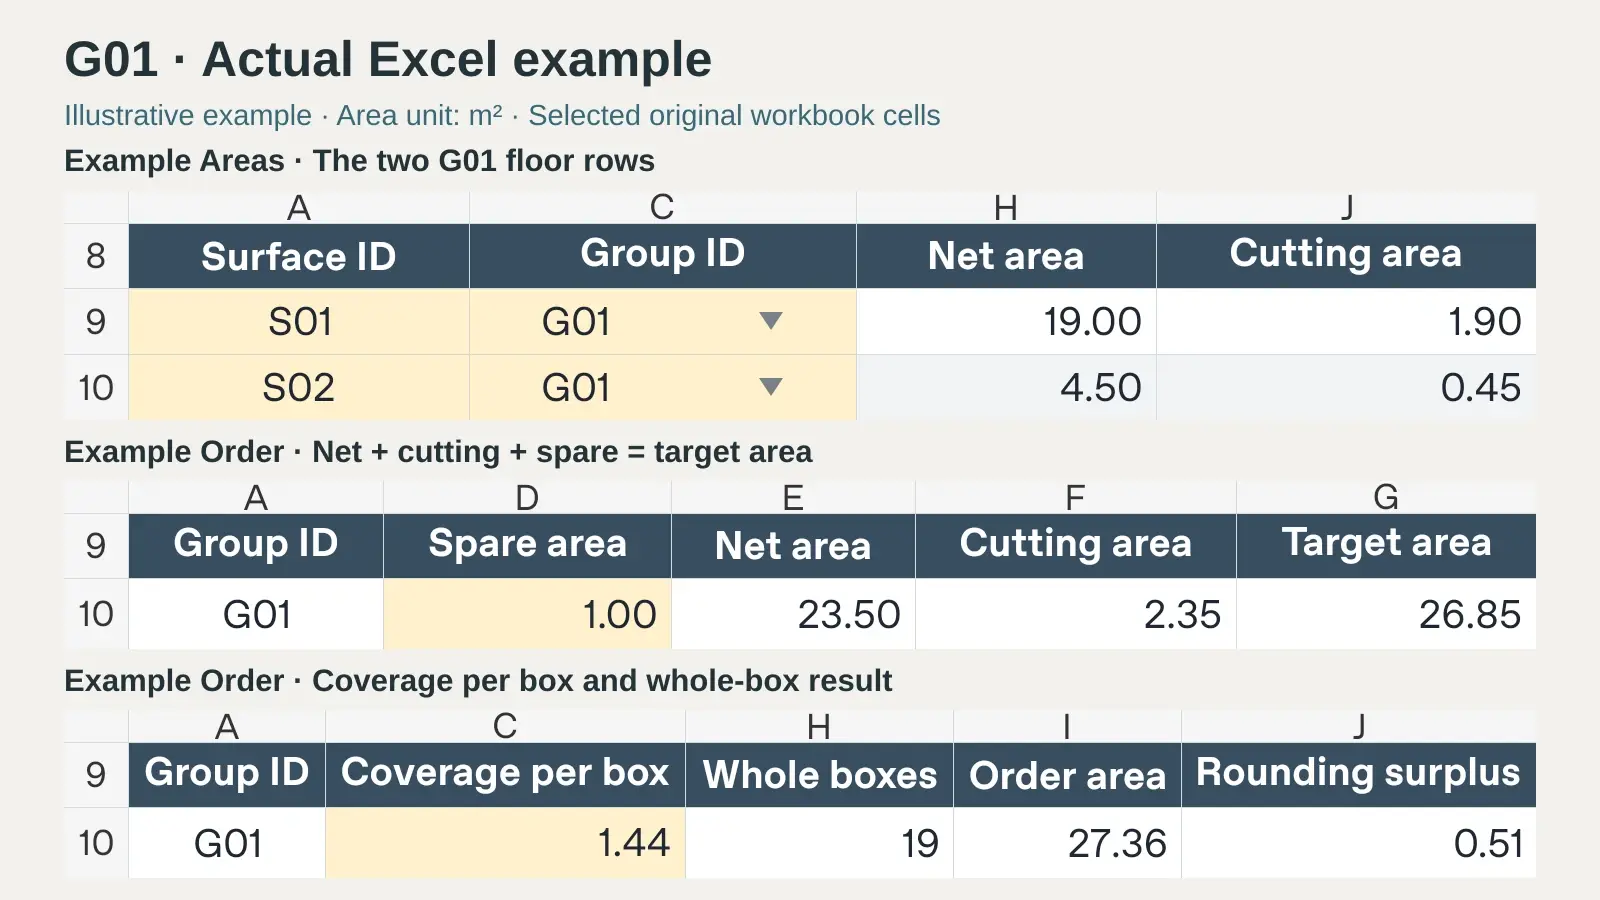
Use Areas for your measurements and Order for product details, spare area and whole-box results. Example Areas and Example Order contain a separate worked example; their quantities do not feed your blank order. Each set allows 40 rectangular surface records and 10 purchase groups. Larger projects need the formulas, validation and summary ranges extended together.
Choose Units and Identify Each Surface
Select m² or ft² for the calculation set before entering measurements. Use metres with m² and feet with ft²; the unit selector labels the inputs but does not convert numbers already entered. Convert millimetres, inches or mixed survey units first. Enter one row per rectangular section, identify the room and surface, and select the relevant purchase Group ID.
Review the Calculated Results
The workbook calculates gross area, net area and the cutting allowance for each surface. Order pools the valid rows by Group ID, adds the spare area entered for that group, and calculates whole boxes, ordered coverage and rounding surplus. Complete any flagged input before using the result for purchasing. Keep the example sheets unchanged as a reference.
Measure the Net Tile Area
Record Dimensions and Confirm Deductions
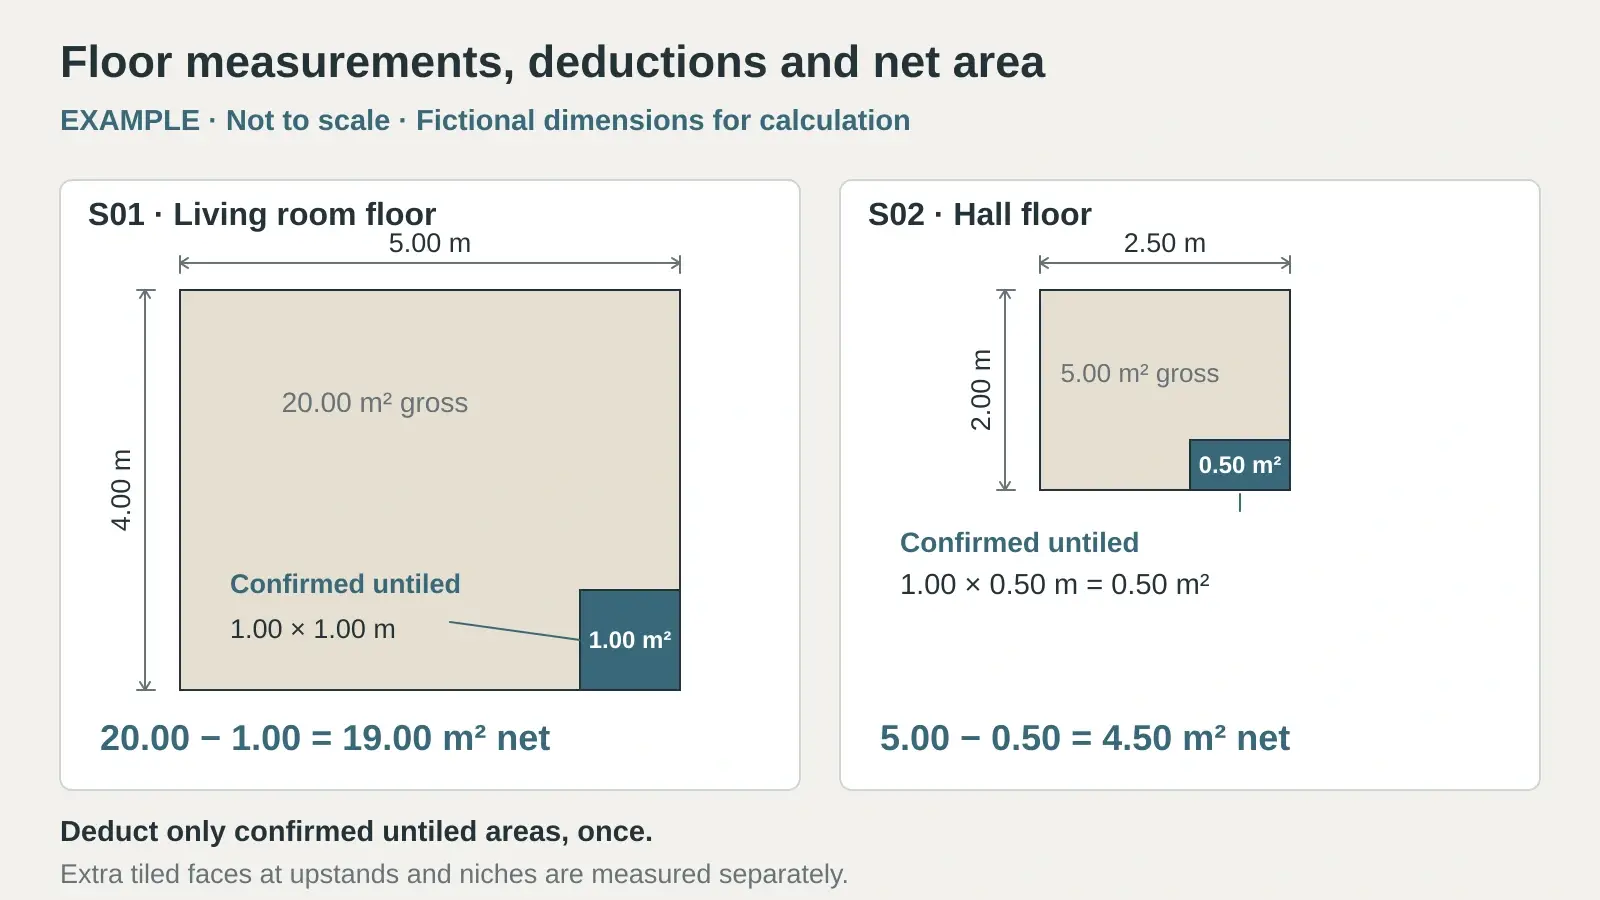
For a rectangular floor, multiply length by width. For a wall, multiply its width by the tiled height. Keep the gross area and deductions in separate fields: net area equals gross area minus confirmed untiled area. Record what each deduction represents and link the room and surface to the room and finish codes in a finish schedule.
Do not automatically subtract every fixture footprint. Tile may continue below a cabinet or into a recess, depending on the agreed scope. Deduct an opening only from the surface it belongs to, and add tiled returns, niche sides or other additional faces as separate measured rows. A deduction larger than its gross surface area needs correction.
Split Irregular Shapes and Separate Special Items
Divide an L-shaped floor into non-overlapping rectangles and label them on the same sketch. Use additional rows for each section. For triangles, curves or other shapes, prepare an equivalent area calculation outside the rectangular input rows and retain its reference; do not enter invented rectangle dimensions to force a result. These external calculations do not feed Order automatically, so reconcile them separately before purchasing.
Keep different tiles in separate groups. Borders, mosaics, skirting, trims and stair pieces may be ordered by sheet, length or piece rather than the area basis used here. Measure and price those separately unless the supplier confirms an appropriate area-per-box basis for the selected item.
Keep Cutting Allowance and Spare Stock Separate
Agree the Cutting Allowance from the Layout
For each surface, cutting allowance equals net area multiplied by the entered cutting rate. Choose the rate with the installer after reviewing tile format, setting-out, edge cuts, pattern direction and opportunities to reuse offcuts. Diagonal, mixed-format or highly detailed work needs its own layout review. A percentage estimate cannot count every cut or guarantee that an offcut will fit elsewhere.
Confirm tile edges and joint planning before finalising the layout. Do not reduce the order by an assumed grout-joint percentage or treat rectified tile as a reason to remove the cutting allowance. The 10% cutting rate in the example below is an illustration, not a recommendation for every installation.
Enter Spare Stock as an Explicit Area
Spare stock is material intentionally kept for later replacements. Enter the required reserve area once for each purchase group, separately from installation cutting allowance. If the brief specifies a percentage of net area, convert it to area first and record the basis. If it requires one unopened box, enter that box's confirmed coverage as the reserve and arrange for it to be set aside.
Daltile describes attic stock as additional tile purchased and stored for future use, with matching production characteristics a reason to plan ahead. Confirm the required reserve, product identifiers and storage arrangements with the project team. Remaining offcuts and the spreadsheet's rounding surplus are not automatically a usable replacement stock.
Use Carton Coverage and Round Up to Whole Boxes
Confirm Coverage for the Exact Product
Enter the area per box from the selected product's current packaging or supplier-confirmed packing data, in the same area unit as the order. Record the SKU, size, thickness, colour, finish, shade and calibre information. Use our porcelain and ceramic tile selection guide to check the product choice separately from its quantity.
Do not assume that nominal tile dimensions multiplied by pieces per box give the supplier's declared coverage. The American Olean Reservorio sales sheet, for example, lists different carton quantities and coverage for floor and fluted wall products sharing a nominal size. Resolve any discrepancy before ordering. Where purchase is by piece instead, confirm the supplier's piece basis and use a separate piece count.
Pool Compatible Areas Before Box Rounding
Use one Group ID only for material that can be ordered and allocated together: the same specified product, finish, dimensions, compatible batch requirements and box coverage. Separate delivery phases or areas that cannot share stock may need separate groups. A shared Group ID is a purchasing decision, not proof that two products are interchangeable.
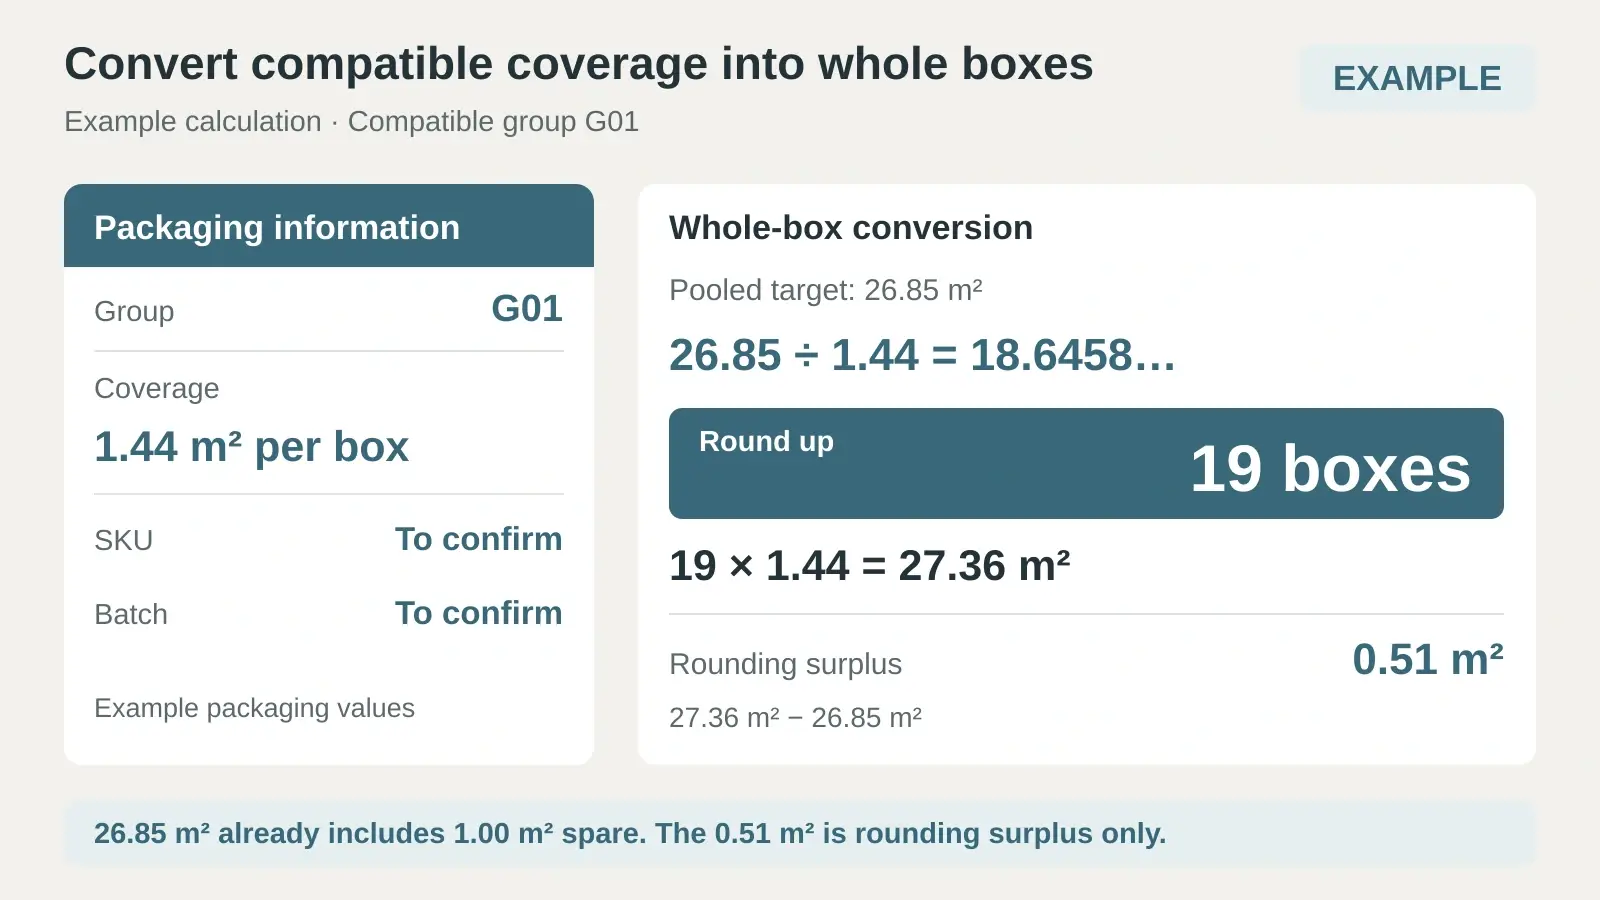
For each group, add net area, cutting allowance and the specified spare area. Divide that target by coverage per box and round up once. Microsoft's ROUNDUP documentation explains that a second argument of 0 rounds up to an integer. Rounding each room to boxes before pooling can inflate the total; rounding the final result down can leave the order short.
Worked Example from Net Area to Whole Boxes
The Example sheets use the same tile group for two measured surfaces. All areas below are in m². The dimensions, 10% cutting rates and 1.00 m² spare area are example inputs that require replacement with project values.
| Surface | Gross area | Deductions | Net area | Cutting area |
|---|---|---|---|---|
| Main floor 5.00 × 4.00 m | 20.00 | 1.00 | 19.00 | 1.90 |
| Second floor 2.50 × 2.00 m | 5.00 | 0.50 | 4.50 | 0.45 |
| Group total | 25.00 | 1.50 | 23.50 | 2.35 |
| Calculation | Result |
|---|---|
| Net area plus cutting area | 25.85 m² |
| Separate spare area | 1.00 m² |
| Target area including spare stock | 26.85 m² |
| Confirmed coverage per box | 1.44 m² |
| Whole boxes ROUNDUP(26.85/1.44,0) | 19 boxes |
| Ordered coverage 19 × 1.44 | 27.36 m² |
| Rounding surplus 27.36 − 26.85 | 0.51 m² |
The spare allowance is already included in 26.85 m². The additional 0.51 m² comes from buying whole boxes; do not add the spare area a second time. Keep this distinction visible when comparing quotations or discussing material left after installation.
Check the Tile Order Before Release
Compare the measurements with the current drawing revision, confirm deductions and additional tiled faces, and review each Group ID for consistent product and packing information. Check both the first and last populated rows after adding data. Blank or zero box coverage, an unknown group, or an incomplete surface must be resolved before the box result is used.
Confirm the actual shade, calibre and production records with the supplier. Marazzi's tile FAQ distinguishes shade and calibre markings on packaging. A product code or an approved colour sample alone does not establish that all delivered cartons meet the intended batch requirements.
Connect the checked estimate to drawing and material sample coordination before purchase release. Confirm pricing units, stock availability, minimum order or pallet requirements, delivery splits and the reserve allocation. This workbook estimates tile area and boxes; adhesive, grout, waterproofing, substrate preparation and installation labour require separate quantities and pricing.
Frequently Asked Questions
What Is the Excel Formula for Tile Boxes
For positive, checked inputs, the basic formula is =ROUNDUP(TargetArea/CoveragePerBox,0). TargetArea includes net area, the cutting allowance and the agreed spare area. The workbook uses its own cell references and checks; a blank coverage value is not a valid zero-box result.
How Much Extra Tile Should I Order
Agree installation allowance from the actual layout, then specify replacement stock separately. There is no single percentage that suits every tile, room and pattern. Record each assumption and avoid counting the same reserve in both the cutting rate and spare-area input.
Can the Calculator Work in Square Feet
Yes. Select ft² and enter linear measurements in feet, deductions and spare stock in ft², and box coverage in ft². Changing the selector does not convert existing entries, so convert every affected input before recalculating an existing metric estimate.
Should I Round Each Room to Whole Boxes
Pool compatible areas first when they can share the same order stock. Round once for each purchase group. Use separate groups when the product, packaging, batch requirement or delivery allocation prevents pooling.
Can It Calculate the Exact Cutting Layout
No. It is an area and carton estimator. Pattern repeats, slivers, veining, mixed sizes and large-format cuts may need a drawing-based piece takeoff. Have the installer check that layout before relying on the quantity for purchase.
Send your tile quantities and drawing references with the selected product, layout, packaging details and delivery requirements for a coordinated quotation.