A lighting schedule connects each fixture tag on a drawing to the luminaire to be ordered, its driver and dimming requirements, and the record of what the project team reviewed. Use this Excel template to track those details by room or zone, then check them against the current reflected ceiling plan (RCP) and the supplier’s submittal before releasing an order.
1. Download the Lighting Schedule Template in Excel
The editable workbook includes blank tables and two filled example lines. Use the blank tabs for your project and refer to the example to see how a fixture line connects to its driver, control zone and review decision.
Download the Lighting Schedule Template (.xlsx)
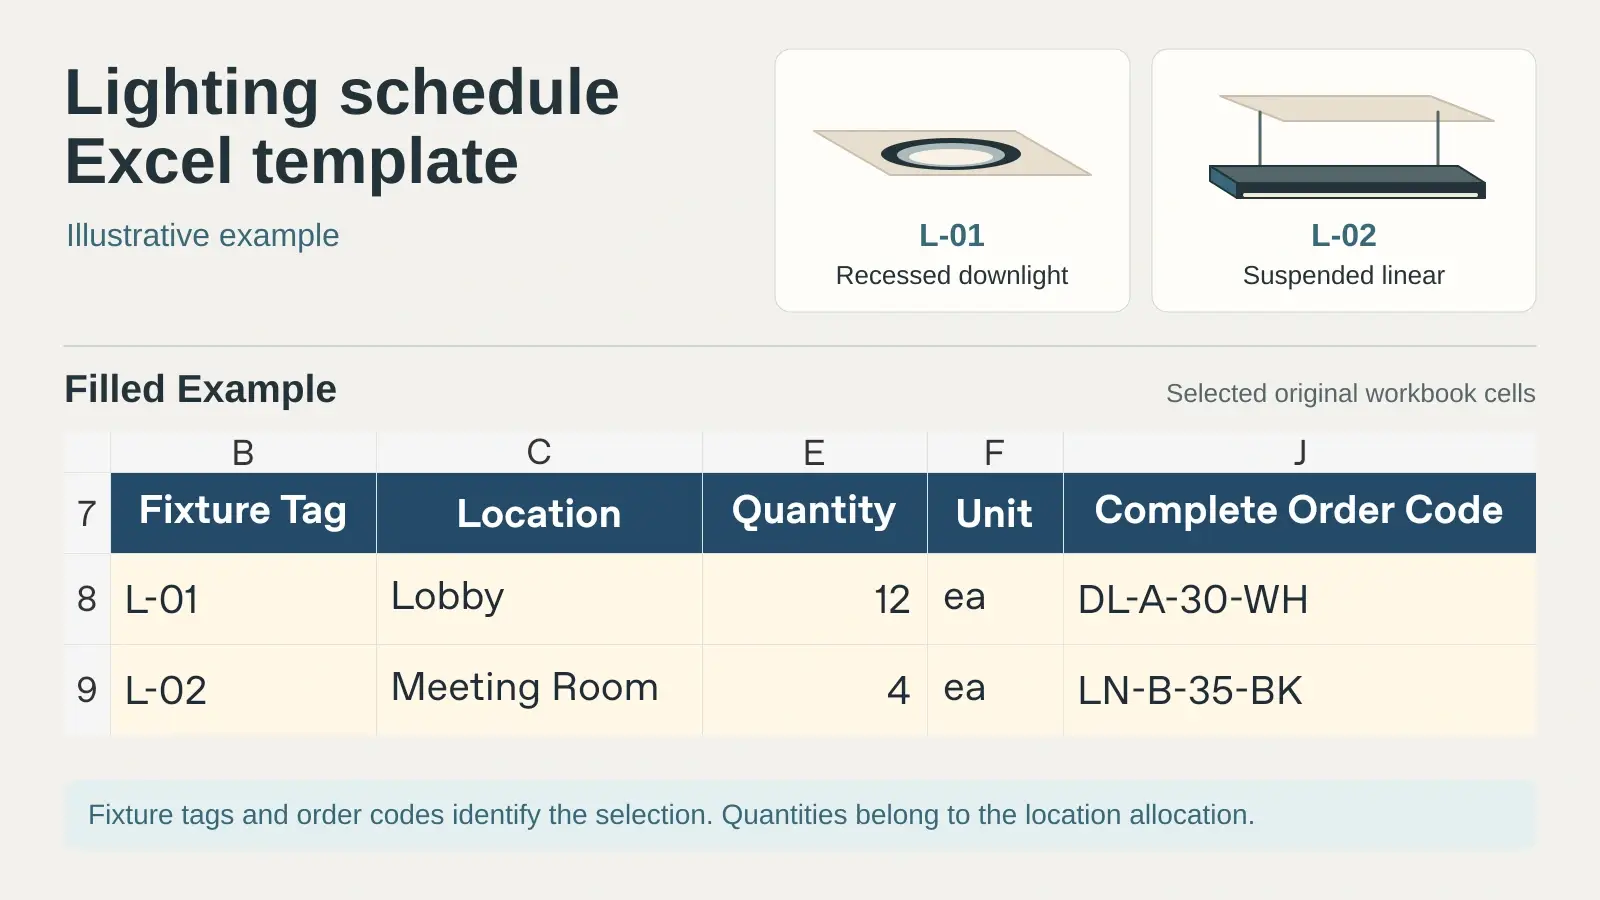
| Workbook tab | What it records |
|---|---|
| Fixture Schedule | Line ID, fixture tag, room, quantity, drawing and revision, model and order code, light characteristics, finish, Selected Review ID and status. |
| Technical Review | Driver ID and mounting arrangement, electrical data, dimming interface and device, control zone, submittal evidence, reviewer decision and open actions. |
| Filled Example | A recessed lobby downlight and a suspended meeting room fixture with different control requirements and unresolved review items. |
| Read Me | Entry rules, the relationship between schedule lines and reviews, and how to maintain the workbook. |
2. Match Fixture Tags, Quantities and Order Codes to the Drawings
2.1 Use a fixture tag and a separate schedule line ID
Copy the fixture tag from the latest RCP or lighting plan. A tag such as L-01 identifies a fixture type or configuration; it can appear multiple times on a drawing. Give each schedule row its own Line ID, such as LS-001, so reviewers can link a decision to one room or zone allocation. If the same tag appears in several rooms, split the rows where quantities, drawing references or controls need separate tracking. If the specified fixture configuration changes, coordinate the tag and drawing legend before ordering.
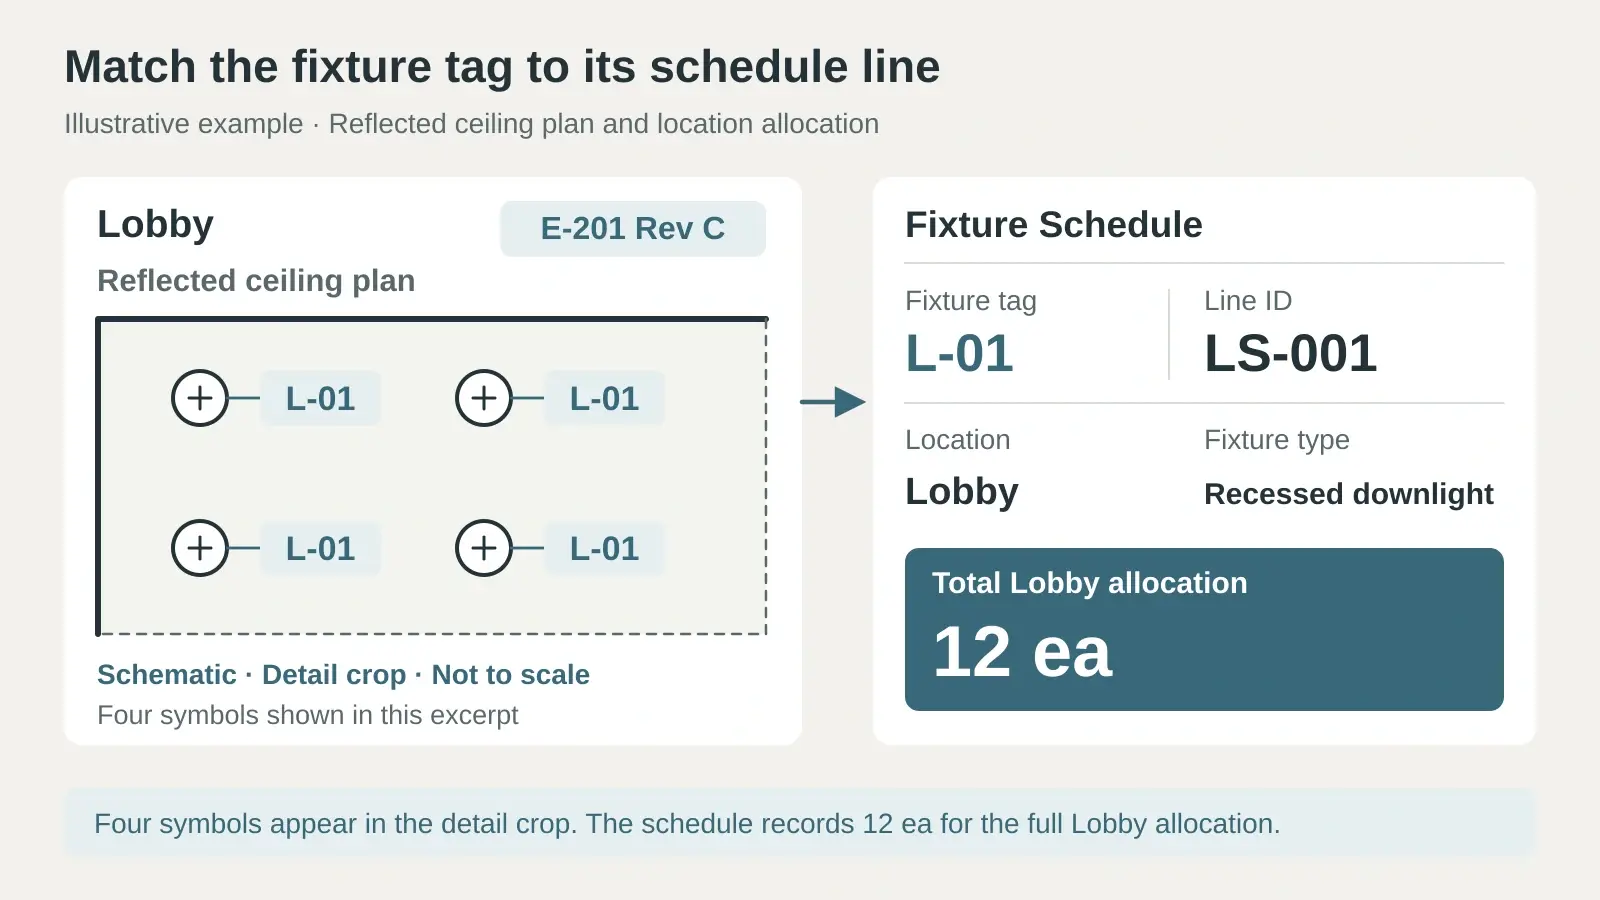
Record the room or level, quantity and unit, sheet and revision, and mounting detail where applicable. Count each location once, and mark whether a repeated room quantity is per room or already multiplied. For repeated guest rooms, see hotel room type coordination. If decorative or portable lamps also appear on an FF&E schedule, identify which register carries the purchase quantity so both lists do not count the same item.
2.2 Record the exact fixture configuration
A family name helps identify the product range. The full manufacturer order code and listed options tell the supplier which version to quote. Record the housing or mounting kit, optical distribution, trim and finish, light source, and any driver, control or emergency option required for that line. If the driver, housing or accessories are separate items, capture their codes and quantities in the referenced submittal or quotation. Verify what is included before comparing prices.
Record correlated color temperature (CCT) in kelvins and color rendering index (CRI) separately. Add delivered luminaire lumens, input watts, beam angle or distribution, and the matching photometric file where specified. Equal wattage and CCT do not establish equal light output or beam shape. Check the cutout, ceiling depth, support and trim against the detail and room finish schedule. The project lighting fixture specifications page lists related quotation inputs, including optics, controls and samples.
3. Record the Driver and Dimming Requirements
3.1 Identify the driver and where it sits
Enter the exact driver model or part number. An integral driver is supplied within the fixture assembly; a remote driver sits separately, for example in a specified enclosure. For a remote driver, ask the supplier to show the proposed location, access for replacement and any limits on the connection to the luminaire. Confirm which driver, enclosure and accessories the quotation includes.
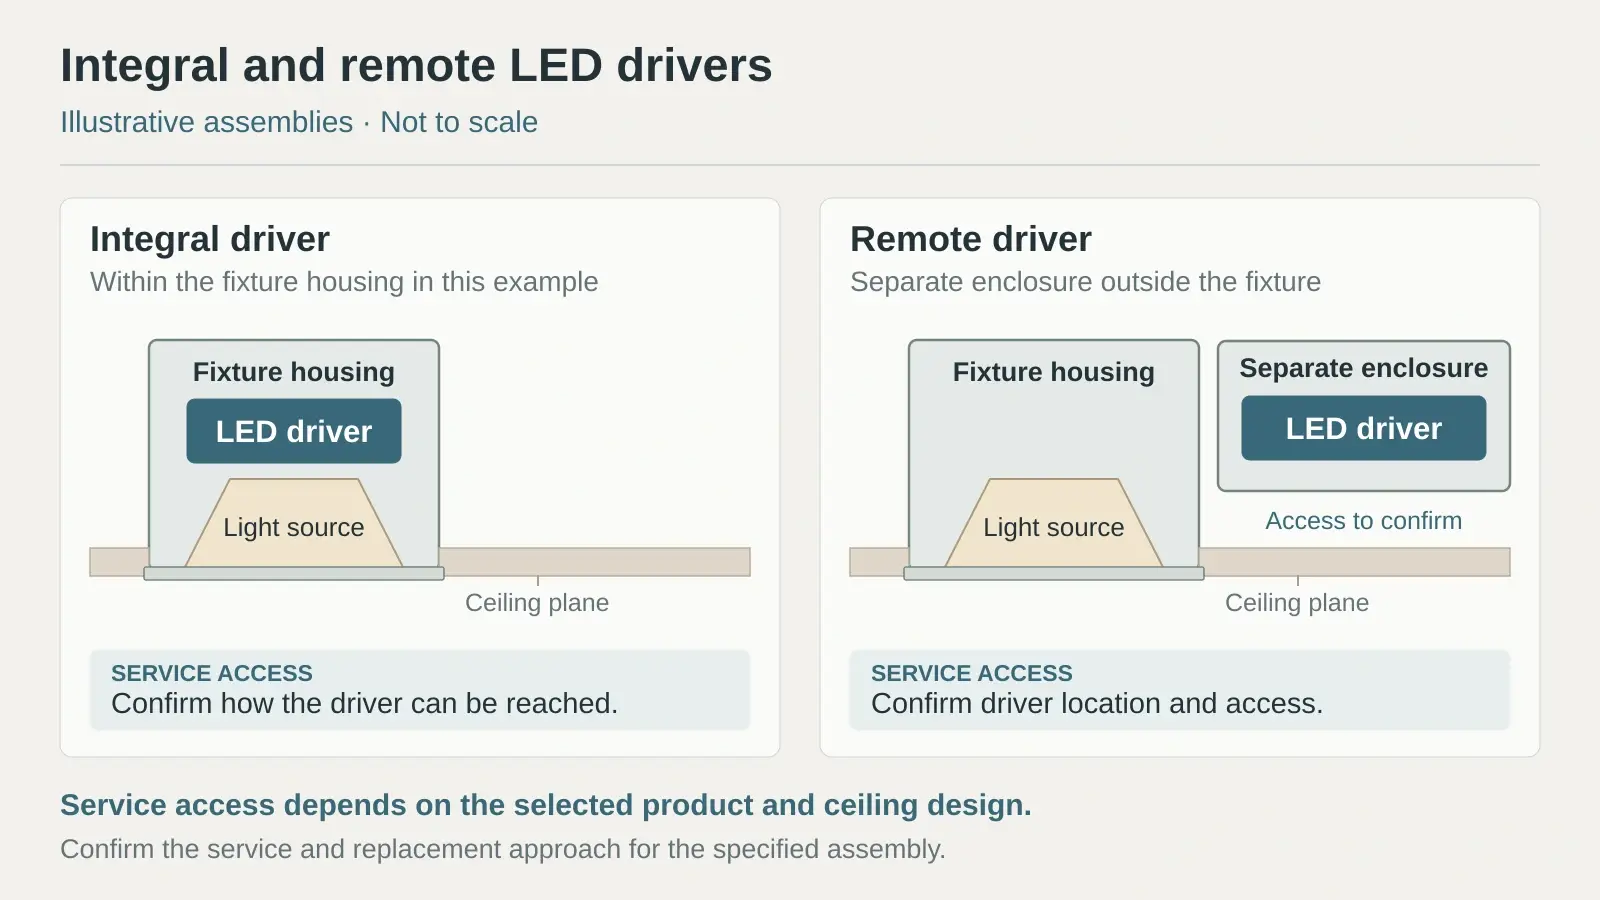
Check the submitted driver input against the project supply and the driver output against the LED load. A constant current driver must match the required current and support the load’s operating voltage range; a constant voltage driver must match the required output voltage and support the load. Record the relevant values and settings from the manufacturer’s documentation. A similar wattage or a matching dimming label does not confirm compatibility.
3.2 Keep the dimming interface, control device and zone separate
Record the required interface, the exact controller or dimmer when selected, and the zone or group the fixture should respond to. Keep the supply circuit reference in a separate field or in the electrical drawings. A control zone describes fixtures intended to respond together; a circuit identifies their power supply. The schedule ties those records together without replacing the control drawings or panel schedule.
| Requested control | What to verify for the submitted combination |
|---|---|
| DALI-2 | Exact driver and control device, applicable certification or listing, and how the devices will be grouped and commissioned. |
| 0–10 V | Exact driver and controller, their documented interface compatibility, low-end and off behavior, and any separate switching requirement. |
| Phase cut | Exact dimmer and driver, leading or trailing edge as specified, and permitted loads and performance for the proposed combination. |
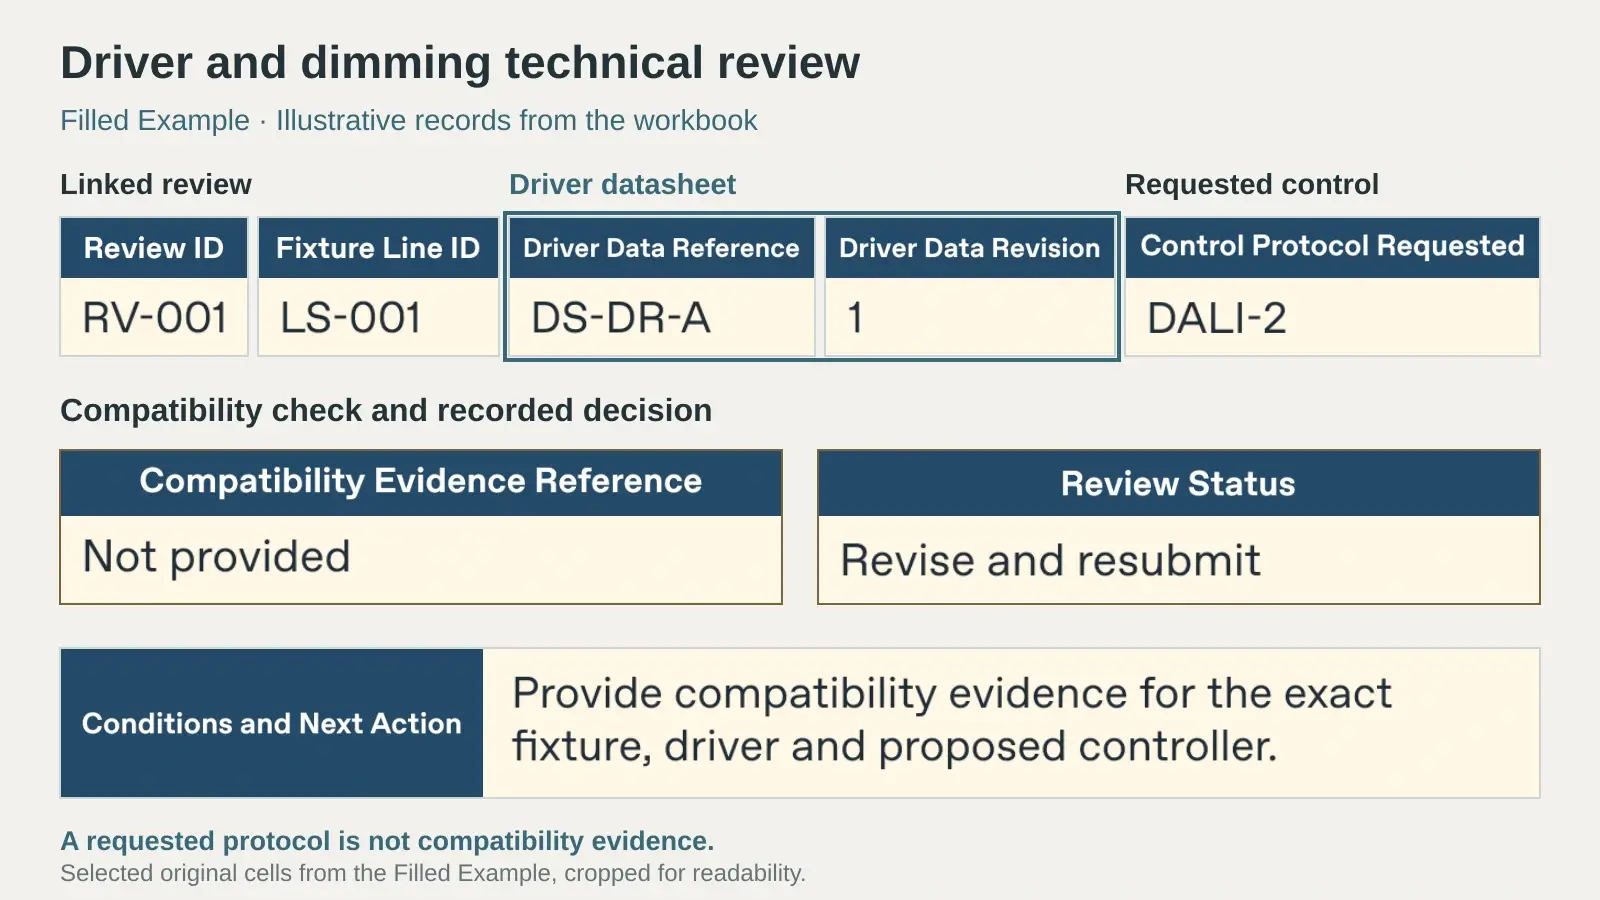
Use “To confirm” when a device, setting or test is still open. If low-level behavior, visual consistency or scene response matters, agree how it will be checked and record the result. A protocol request in the schedule is not evidence that the proposed equipment works together.
4. Review the Lighting Submittal and Record the Decision
4.1 Match each document to the proposed variant
Link the technical review to its schedule Line ID. Reference the supplier’s submittal and revision, fixture cut sheet and order code, driver datasheet, control compatibility evidence and any required photometric file, sample or mock-up. Where a photometric file is required, match it to the optic and light output of the proposed variant. Use it with the lighting calculation if the project calls for one.
Review mounting and finish, light characteristics, electrical and control compatibility, and any project-specific performance or documentation requirements. If a supplier proposes an alternate, record what differs and ask the reviewer to resolve it before replacing the specified selection. See drawing and sample coordination for the procurement steps that support this review.
4.2 Keep the review decision with its revision
Record the reviewer, date, status, conditions, action owner and next action. Enter the current Review ID in the Fixture Schedule’s Selected Review ID column. The workbook displays the linked status. If a new driver, control device or optic is submitted, add a new review entry and keep the earlier revision for reference. An accepted finish sample does not close an open controls issue. Record any release for purchase separately under your project’s approval process.
Before issuing the schedule, reconcile the tags and quantities to the drawing revisions, confirm that the linked reviews are current, and flag unresolved items. Keep the editable workbook and issue a dated PDF if a fixed review copy is needed. Check that the PDF preserves legible headings, drawing references and open actions.
5. Filled Lighting Schedule Example
The example uses fictional product references. Fixture characteristics illustrate how to enter a row; no driver, control device or proposed configuration is approved.
| Fixture line and drawing | Fixture selection | Driver, control and review |
|---|---|---|
| LS-001 · L-01 · Lobby · 12 ea · RCP E-201 Rev C | Recessed downlight; DL-A / DL-A-30-WH; 3000 K, CRI 90, 36°, matte white. | DR-A remote driver; DALI-2 requested; Z-LBY-01; DS-DR-A Rev 1. Revise and resubmit: compatibility evidence missing. |
| LS-002 · L-02 · Meeting Room · 4 ea · RCP E-202 Rev B | Suspended linear; LN-B / LN-B-35-BK; 3500 K, CRI 90, wide diffuse optic, matte black. | DR-B integral driver; 0–10 V requested; Z-MTG-01. In review: controller compatibility and low-end check pending. |
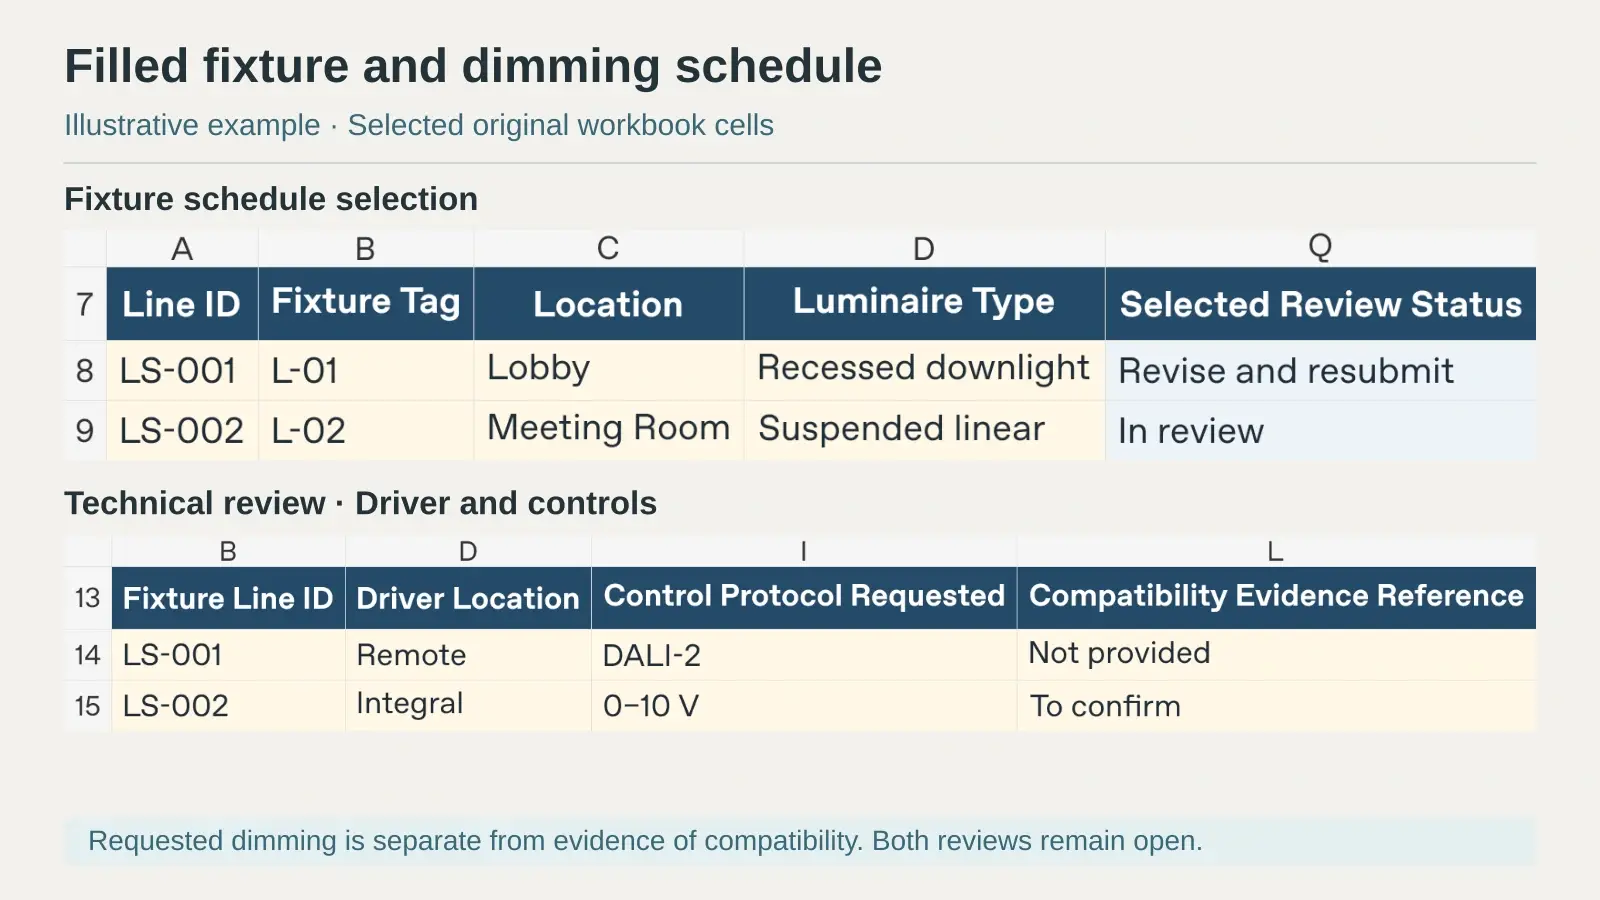
Review RV-001 for L-01 has a driver datasheet, but the reviewer still needs evidence for the proposed control combination. Review RV-002 for L-02 records the required interface and zone while the controller check is pending. Neither entry implies compatibility. Use the same method for your project: record the requirement, the offered component and the review outcome in separate fields.
6. Lighting Schedule Template FAQs
6.1 Is a lighting schedule the same as a reflected ceiling plan?
The RCP shows where fixtures are located and how they relate to the ceiling. The schedule identifies each tagged configuration, quantity allocation, driver, controls and supporting review. Use the same fixture tags across both records.
6.2 Does each individual fixture need its own schedule row?
Use a row per type and room or zone allocation when the fixtures in that row have the same configuration and review basis. Give individual units separate references only when the drawings, controls addressing or commissioning records require it.
6.3 Can this Excel template be used to size lighting circuits?
The template is for fixture selection, quantity tracking and submittal review. Record supply references and manufacturer input data as needed; use the project electrical design and approved documents for circuit sizing, protection, wiring and controls.
7. Prepare a Lighting Package for Quotation
For a project quote, send your lighting schedule and reflected ceiling plans with the current revisions, room quantities, target light characteristics, required dimming interfaces, finishes and review deadlines. Flag open items and ask suppliers to identify any separate driver, control device, mounting accessory or technical evidence in their offer.