A window schedule template records window IDs, locations, dimensions, frame details, glazing references and drawing references in one coordinated list. Use it to connect each opening on a plan or elevation with the information needed for quotation, review and ordering.
The editable Excel workbook below includes blank schedules and a separate filled example. It links individual window IDs to glass and drawing records, so a change can be traced to the affected openings. It suits project owners, builders and designers preparing a window enquiry or coordinating supplier information.
Download the Window Schedule Template in Excel
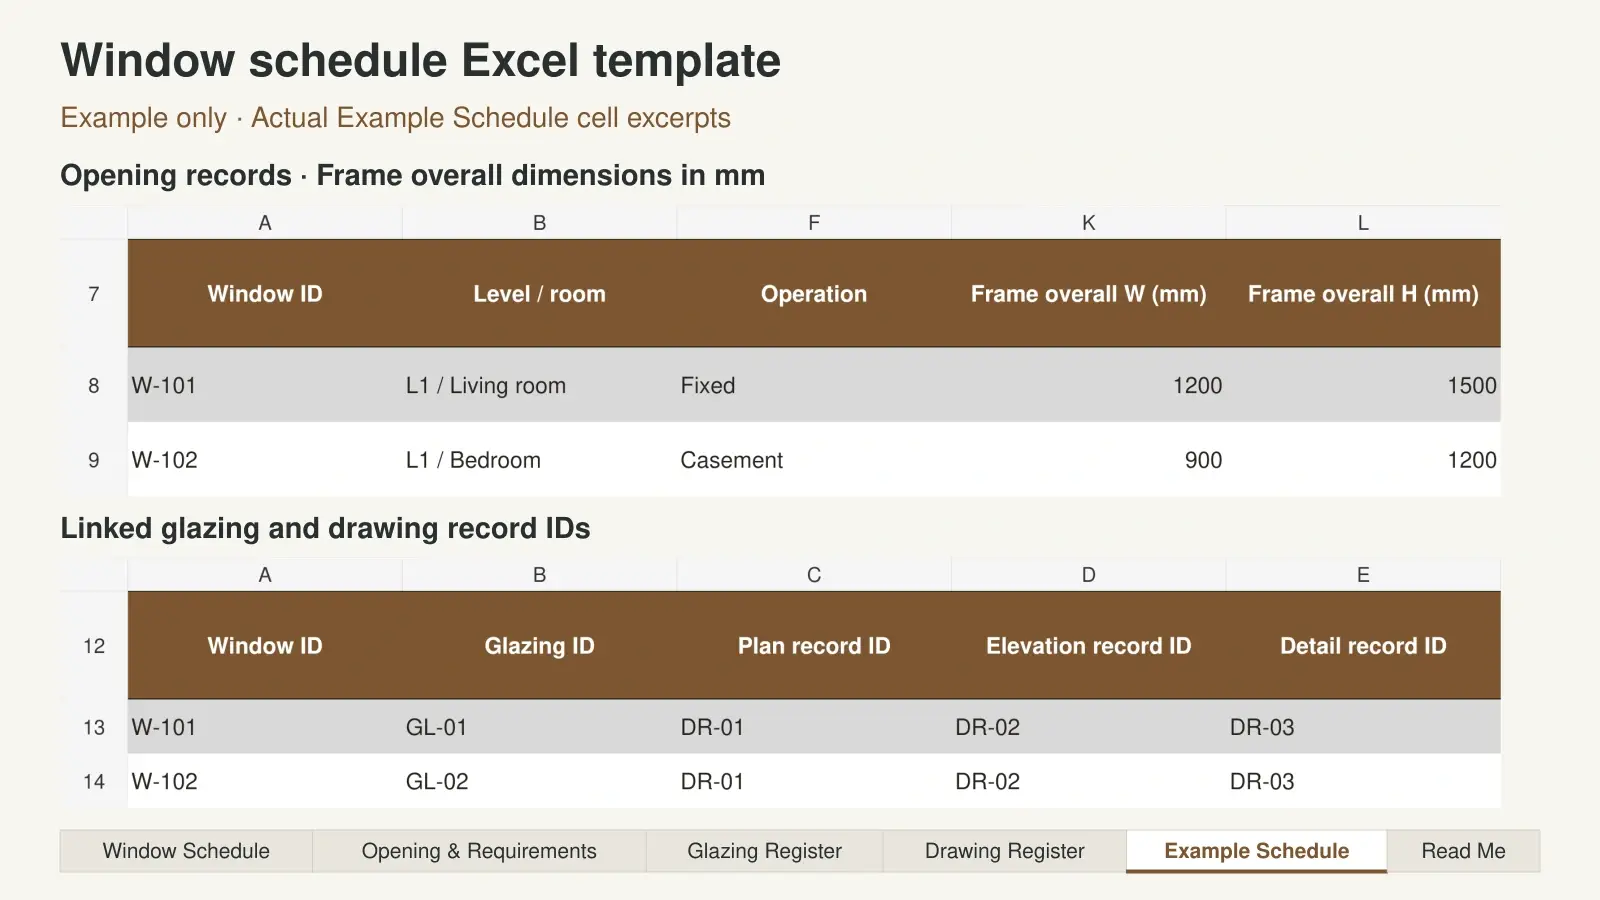
Download the Window Schedule Template XLSX and begin with the Example Schedule sheet. The project input sheets contain blank rows; the fictional example stays separate so it is not included in your project list.
Download the Window Schedule Template XLSX
| Worksheet | What to record |
|---|---|
| Window Schedule | Window ID, location, type, operation, frame, overall frame size, glazing ID and drawing references |
| Opening & Requirements | Rough opening, dimension source, whole-window requirements, review record and production release |
| Glazing Register | Glass build-up, appearance, safety requirements, supporting information and sample status |
| Drawing Register | Drawing record ID, document number, role, revision, issue date and file location |
| Example Schedule | Two fictional openings with matching glass and drawing records |
| Read Me | Field definitions, input conventions, checks and instructions for extending the tables |
The workbook provides filters, frozen headings, selected dropdowns and formulas that flag some missing, duplicate or unmatched references. These checks support data entry; they do not verify drawings, product suitability or approval. Read the instructions before adding rows beyond the prepared ranges.
For a broader view of the product information that accompanies the schedule, see our project window and door systems.
Window Schedule Example
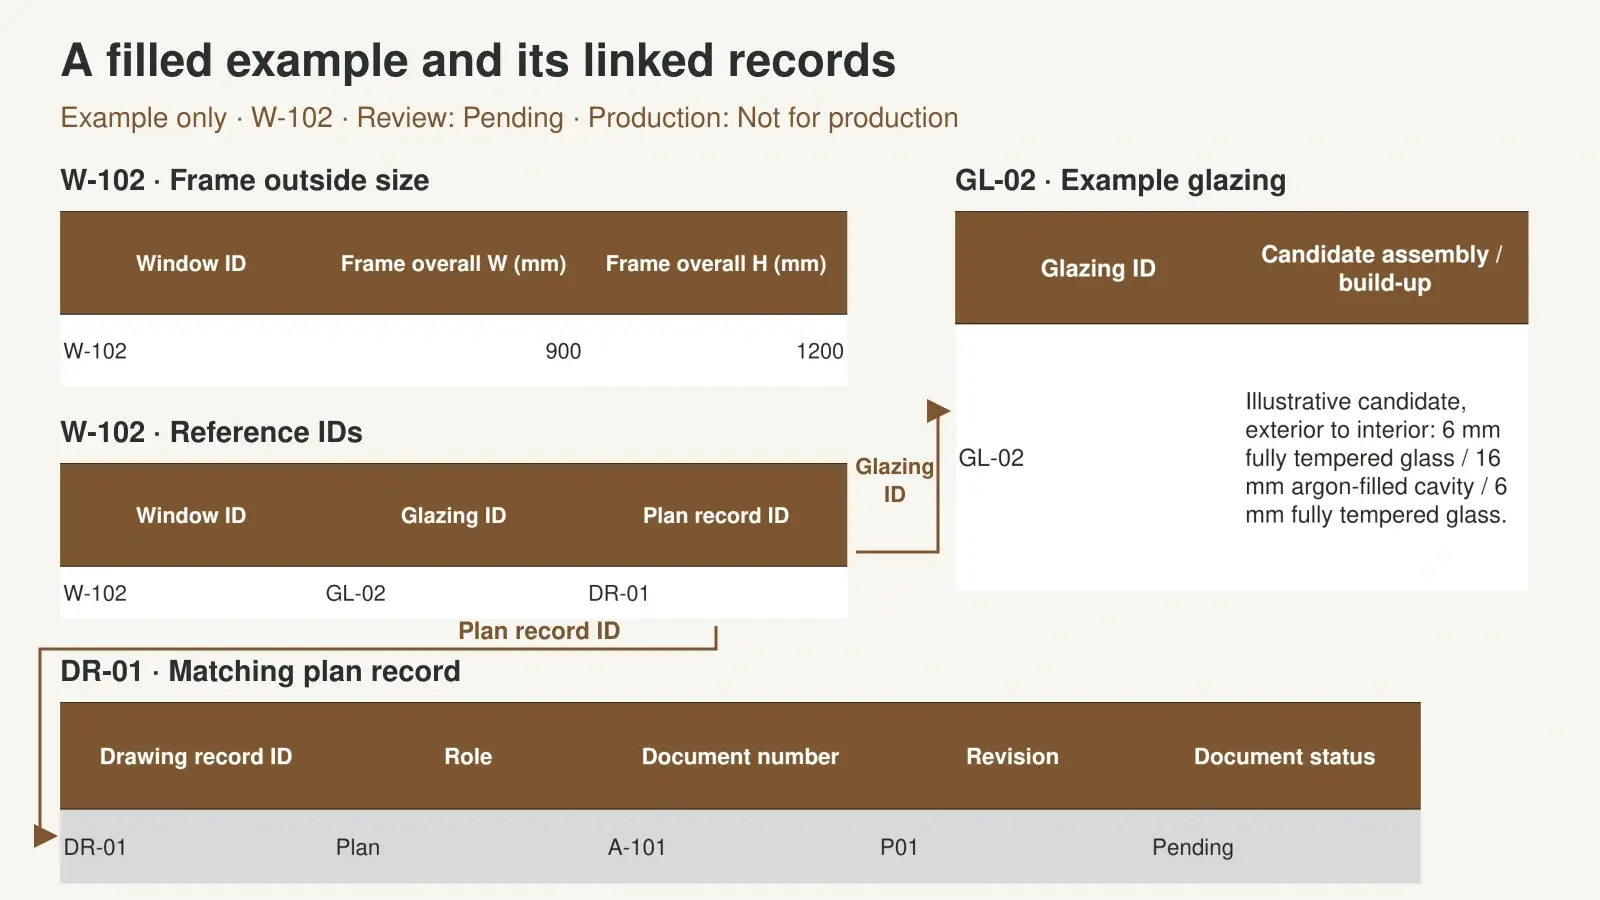
The two openings below illustrate how the workbook connects a window ID to its size, glass and drawings. All dimensions are fictional frame outside dimensions in millimetres. They are examples of data entry, not recommended window sizes. Rough openings remain unconfirmed.
| Field | W-101 | W-102 |
|---|---|---|
| Room | Living room | Bedroom |
| Type reference | WT-01 | WT-02 |
| Operation | Fixed | Casement |
| Frame outside width by height | 1200 by 1500 mm | 900 by 1200 mm |
| Glazing ID | GL-01 | GL-02 |
| Plan record | DR-01 | DR-01 |
| Elevation record | DR-02 | DR-02 |
| Detail record | DR-03 | DR-03 |
| Review and release | Pending and not for production | Pending and not for production |
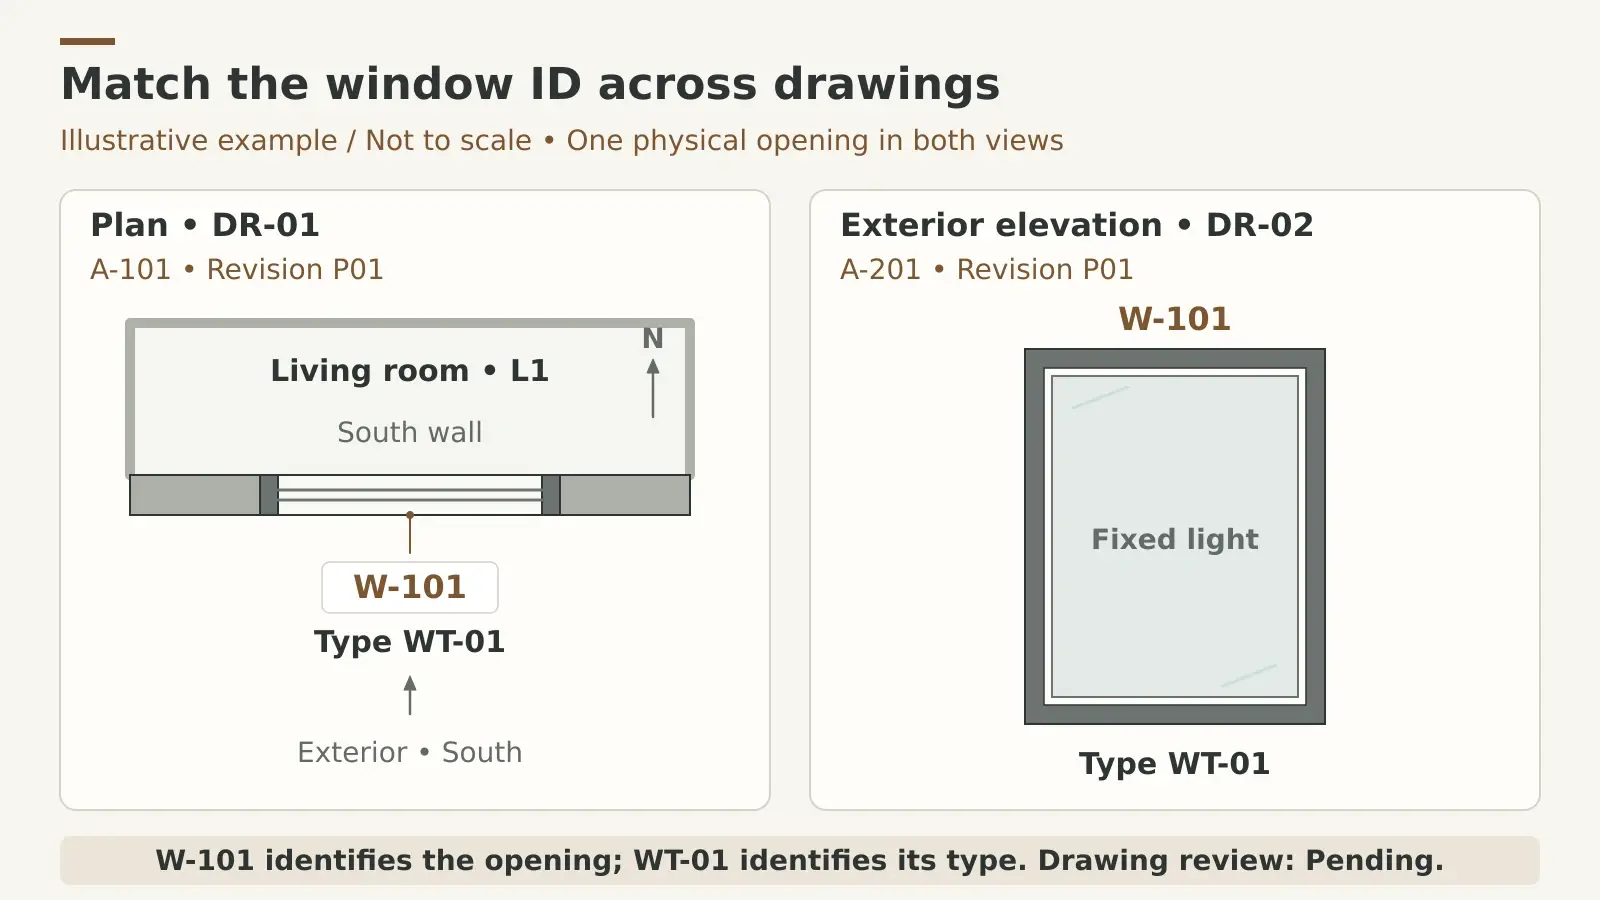
DR-01 identifies plan A-101 at revision P01; DR-02 identifies elevation A-201 at P01; DR-03 identifies detail A-501 at P01. The Drawing Register keeps these document identifiers separate from the window IDs. Both openings can reference the same drawing without sharing a window ID.
GL-01 and GL-02 point to the example glass records. The casement also needs an explicit viewing side and opening description. Check the complete example sheet for those details before creating your own records, and replace every fictional reference with current project information.
Assign Window IDs That Match the Drawings
Separate Individual Openings From Window Types
This workbook uses one unique Window ID for each physical opening. A Type Ref can be reused for openings that share a defined configuration. Two identical fixed windows might therefore be W-101 and W-103, both using WT-01. Keep their locations identifiable even when their specifications match.
Some drawing sets tag windows by type rather than by individual instance. Retain the project’s established marks and document the relationship to the workbook IDs. Do not silently renumber an issued drawing set to fit the spreadsheet. Count individual openings from the coordinated list; the number of types is not the order quantity.
For a combined window assembly, state which opening the ID represents and identify its component units on the elevation or in the notes. One opening record does not necessarily equal one separately manufactured frame or glass panel.
Connect Each Window to the Correct Drawing Revision
Enter separate plan, elevation and detail record IDs for each opening. In the Drawing Register, give every record a document number, drawing role and revision. A detail reference should also identify the view or detail number where necessary, such as detail 3 on A-501.
When a drawing changes, preserve the previous issue and create a new record for the new revision. Update the affected window references after the change is reviewed. A drawing link that still opens a file can nevertheless point to an outdated issue, so check the revision as well as the filename.
Record Window Dimensions With a Clear Measurement Basis
Keep Frame Dimensions Separate From Rough Openings
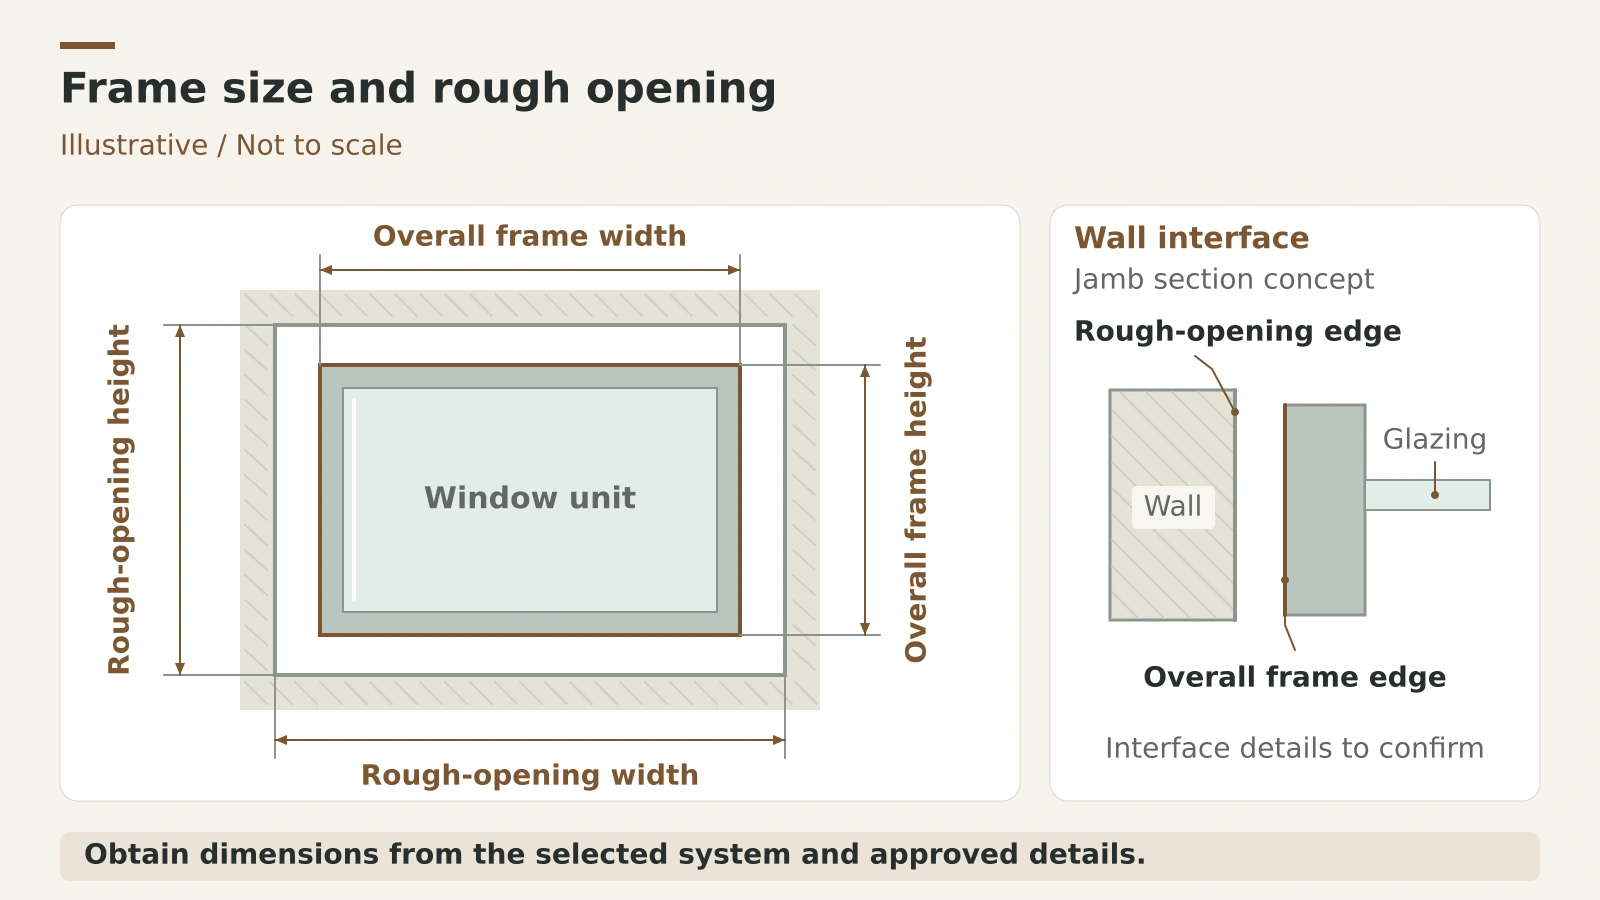
The Window Schedule records overall frame width and height in millimetres. The Opening & Requirements sheet records rough-opening width and height separately. Identify what the supplier includes in its stated frame dimension, especially where flanges, subframes, receptors or joined units affect the assembly.
Nominal size, frame outside size, rough opening and clear opening describe different things. A catalogue callout alone is insufficient for a fabrication order. Our window size and opening-type guide explains why sizes should be checked for the selected product series.
Do not calculate every rough opening by adding one standard allowance to the frame. Use the selected system’s installation information and coordinated wall details. Flashing, shims, perimeter joints and the construction method affect the required space. See the window rough-opening measurement guide when preparing the dimension record.
Identify the Measurement Source and Opening Direction
Record the source and revision of the dimensions, and state whether they are preliminary, taken from drawings or verified on site. For existing openings, retain the detailed survey and identify who must confirm the final order dimensions. A single scheduled width and height does not replace measurements of an irregular opening.
For an operable window, record the viewing side and describe the movement from that side. In the example, W-102 is viewed from the exterior and opens outward with hinges on the left as viewed. Confirm the manufacturer’s designation and the elevation drawing before ordering. For sliding windows, identify the moving panel and direction from the stated side; a standalone left or right label can be ambiguous.
Connect Glass Specifications to Each Window
Use a Glazing ID for the Complete Glass Build Up
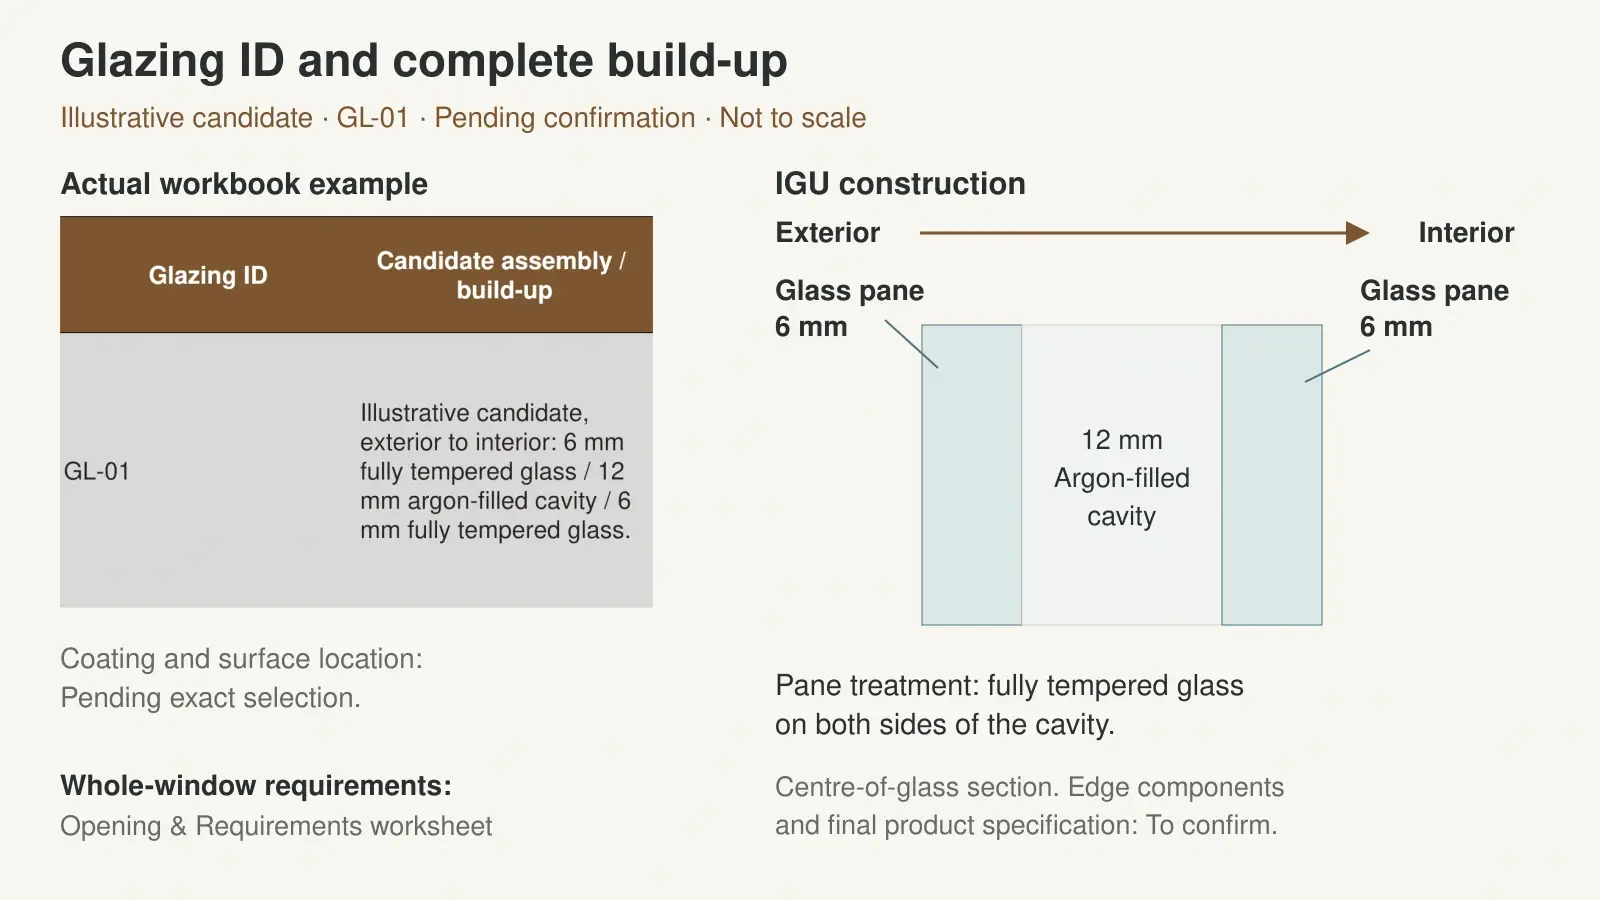
Assign a Glazing ID in the Window Schedule and maintain the corresponding description in the Glazing Register. Describe the assembly from exterior to interior, including pane or ply thicknesses, heat treatment, any laminate and interlayer, cavity and gas where applicable, coatings and their specified positions. Identify the product or specification reference that completes the description.
An insulated glass unit can contain tempered panes, laminated components or both. These terms should not be treated as mutually exclusive choices in one dropdown. The laminated and tempered glass comparison explains the difference between glass construction and treatment.
Include privacy, tint and sample references where they matter. Record the safety-glazing requirement and its project source rather than assuming that a generic glass label establishes suitability. If one window contains different glass in separate panels, add a panel identification and the corresponding glazing mapping in the notes or referenced elevation.
Keep Whole Window Requirements Separate From Glass Values
Record the required whole-window performance in Opening & Requirements, with the metric, value, unit and source. This may include thermal, solar, air, water, structural or acoustic requirements where specified. Identify the proposed system and supporting evidence separately so a requirement is not mistaken for a verified product result.
Glass-only values do not establish the performance of the complete frame, sash, spacer and glazing assembly. For a U-factor or U-value, retain its units and rating basis. For solar or acoustic values, retain the applicable metric, test method and scope. Do not compare figures from different bases as if they were equivalent.
Egress, fall protection, safety glazing, wind and other requirements depend on the location, application and applicable project rules. Obtain the required criteria from the responsible designer or authority. The template leaves these requirements for project entry rather than supplying default compliance values.
Check the Schedule Before Requesting Quotations
Coordinate the Frame Finish Hardware and Included Work
State the proposed frame system and finish, with sample or specification references. Where interior and exterior finishes differ, identify both. Include hardware, screens, restrictors, interfaces or accessories in the notes or referenced documents so the supplier can see the complete scope.
Use the same window IDs, sizes, operation, glass and performance brief when comparing alternatives. Our aluminum and uPVC window comparison covers the system details and quotation scope to compare. Separate product supply, site measurement, installation, delivery and other included work in the quotation review.
Before issuing the schedule, check that every opening has the correct location, dimension basis, glazing reference and current drawing references. Investigate formula flags, then review the actual drawings and specifications. A sheet without flagged cells may still contain an incorrect selection or an incomplete requirement.
Record Review and Production Release Separately
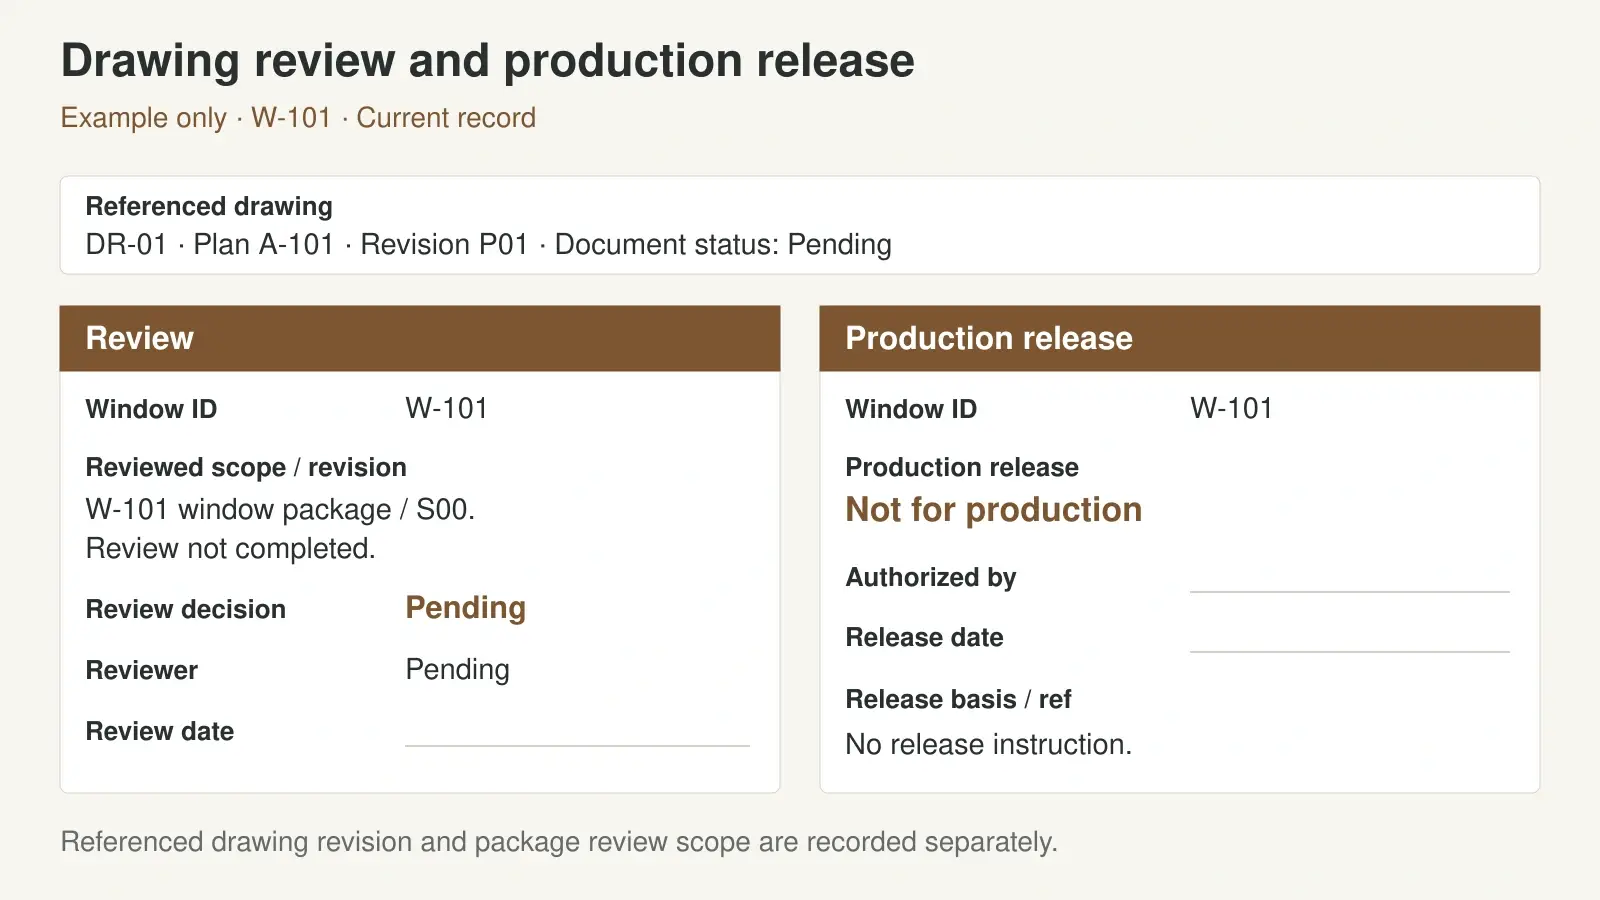
The Opening & Requirements sheet provides a current review record and a separate manual production-release record. Identify the reviewed scope, document and revision, reviewer, decision and date. Keep earlier issued files or the project’s formal approval log as the history; overwriting a current row does not preserve earlier decisions.
A completed schedule or reviewed drawing is not an automatic instruction to manufacture. Record any release, its authorized party, date and supporting reference according to the project’s process. Recheck the affected dimensions, glass, drawings and release record whenever the specification changes.
George House Material supports drawing and sample coordination within the agreed procurement scope. Final approval remains with the client or appointed project consultant. When preparing an enquiry, send your window schedule and drawings for review, together with the project location, required standards and delivery information. Clearly identify anything still pending.
Frequently Asked Questions
What Is a Window Schedule Template
A window schedule template is a reusable table linking window marks or IDs to locations, dimensions, operation, frame, glass and related project documents. It helps readers move from a tagged opening on a drawing to its requirements.
Can I Edit the Window Schedule in Excel
Yes. The download is an editable XLSX workbook with blank input tables and a separate example. Use the prepared fields and dropdowns, retain the formula columns, and follow Read Me when extending the tables. It does not synchronize automatically with CAD or BIM files.
Can Several Windows Share One Type Reference
Yes. Identical configurations can share a Type Ref. This workbook still gives each physical opening its own Window ID so its location, dimensions and drawing references remain traceable. Follow the marking convention agreed for the project.
Should I Enter Frame Size or Rough Opening Size
Enter each in its labelled field. Frame outside dimensions belong in Window Schedule; rough-opening dimensions belong in Opening & Requirements. Verify their relationship against the selected system and installation details before releasing an order.
Is This Also a Door Schedule Template
Use the separate door schedule template in Excel for door leaves, frames, handing, hardware sets and approval records. Coordinate both schedules against the same drawing set while retaining the fields needed for each product.
Does a Filled Window Schedule Authorize Production
No. Completion, review and production release are separate steps. The responsible parties must confirm the relevant dimensions, specifications and documents, and record any release through the agreed project process.